Fix Your Most Common Chipping Mistakes

The two most common mistakes I see golfers battle with when chipping are poor pace; the club head travels in a jerky fashion or at speeds that are often too fast for the requirements of the shot and they struggle to get the club to bottom out in the correct location relative to the ball. Pace and low point! Watch the video below and then let’s check in on some of the key points…

Here are a few points to take away:

Pace

  • Feel an even, ‘tick, tock” type pace as you swing the club back and forth

  • A good practice is to hit a few simple chip shots with a 7 iron. This will give you an excellent sense of what the pace should feel like

  • Try to feel the transition be as passive or gentle as you can. That change of direction needs to be silky smooth

Low Point

  • The practice rehearsals I demonstrated in the video are very important. Practice those both, away from the course and when playing

  • Feel your weight staying forward in the backswing as this will aid you in being able to shift the low point forward

As with anything, practice is integral to improvement. Try a few of those 7 iron shots in practice and don’t allow yourself to make a practice motion without having the intent of getting the club to bottom out of the target side of the ball.

I hope these ideas prove to be helpful to you and your enjoyment out on the golf course. Thanks, as always, for your support and readership.

Brett Rumford

Stop the Scoop

Are you tired of putting everything you have into your game, only to see the ball literally limp off the club face after each swing? There’s just no return on the energy you’re putting in. Today I’m going to show you how to get the sizzle back into your ball striking. Watch this video first…

I often ask my students which club imparts the most energy into the ball relative to club speed. The answer? Putter. Why? It has the least loft at impact and delivers the least oblique strike to the ball. Learn to reduce the loft coming into impact in order to start compressing the ball off the club face.

  1. Get the club face in place early in the downswing. This is done by bowing/flexing the lead wrist which in turn will de-loft and strengthen the club face by the time impact occurs.

  2. Try the Preset Club Face Drill. Using a 7 iron, take the club back so that the shaft is parallel to the ground making sure the lead wrist and leading edge are tilted down towards the ground slightly. Wind the arms back 1 foot and rotate through, working to maintain the face and wrist angles. The ball flight should be low and penetrating with a slight draw.

  3. Make sure that the low point of the swing arc is forward of where impact occurs. This can be rehearsed by making two practice swings between each shot you hit on the range where the sole of the club bottoms out well in front of where it was resting on the ground. The handle and weight must be forward at impact in order for this to occur.

compression.jpg

If you’re a scooper you owe it to yourself to give these ideas a try. My 30 years of teaching golf say that they truly do work and with a little patience and persistence you’ll significantly improve the quality of your ball striking.

Remember - there is no magic, only hard work and a good solid plan. Get to it!

A Strict No Tipping Policy!

We’ve all been there - a constant battle between fats and thins, blocks and sweeping hooks! This malady is something I experience all too often on my lesson tee and I have an idea that I know will help many of you. Once you work your way through this article your approach to ball striking, your concept of how it should work, will never be the same again. Take a look…

I have come to believe that the primary culprit in tipping the upper body back is the quest to work the clubhead back to the inside or shallow the club on the downswing. I’ve written that “It’s All About Impact”, but you can only arrive at an appropriate impact when certain elements are in place going back and on the way down. The better the clubhead is positioned in the early downswing the less likely golfers are to tip their shoulders and spine away from the target too early.

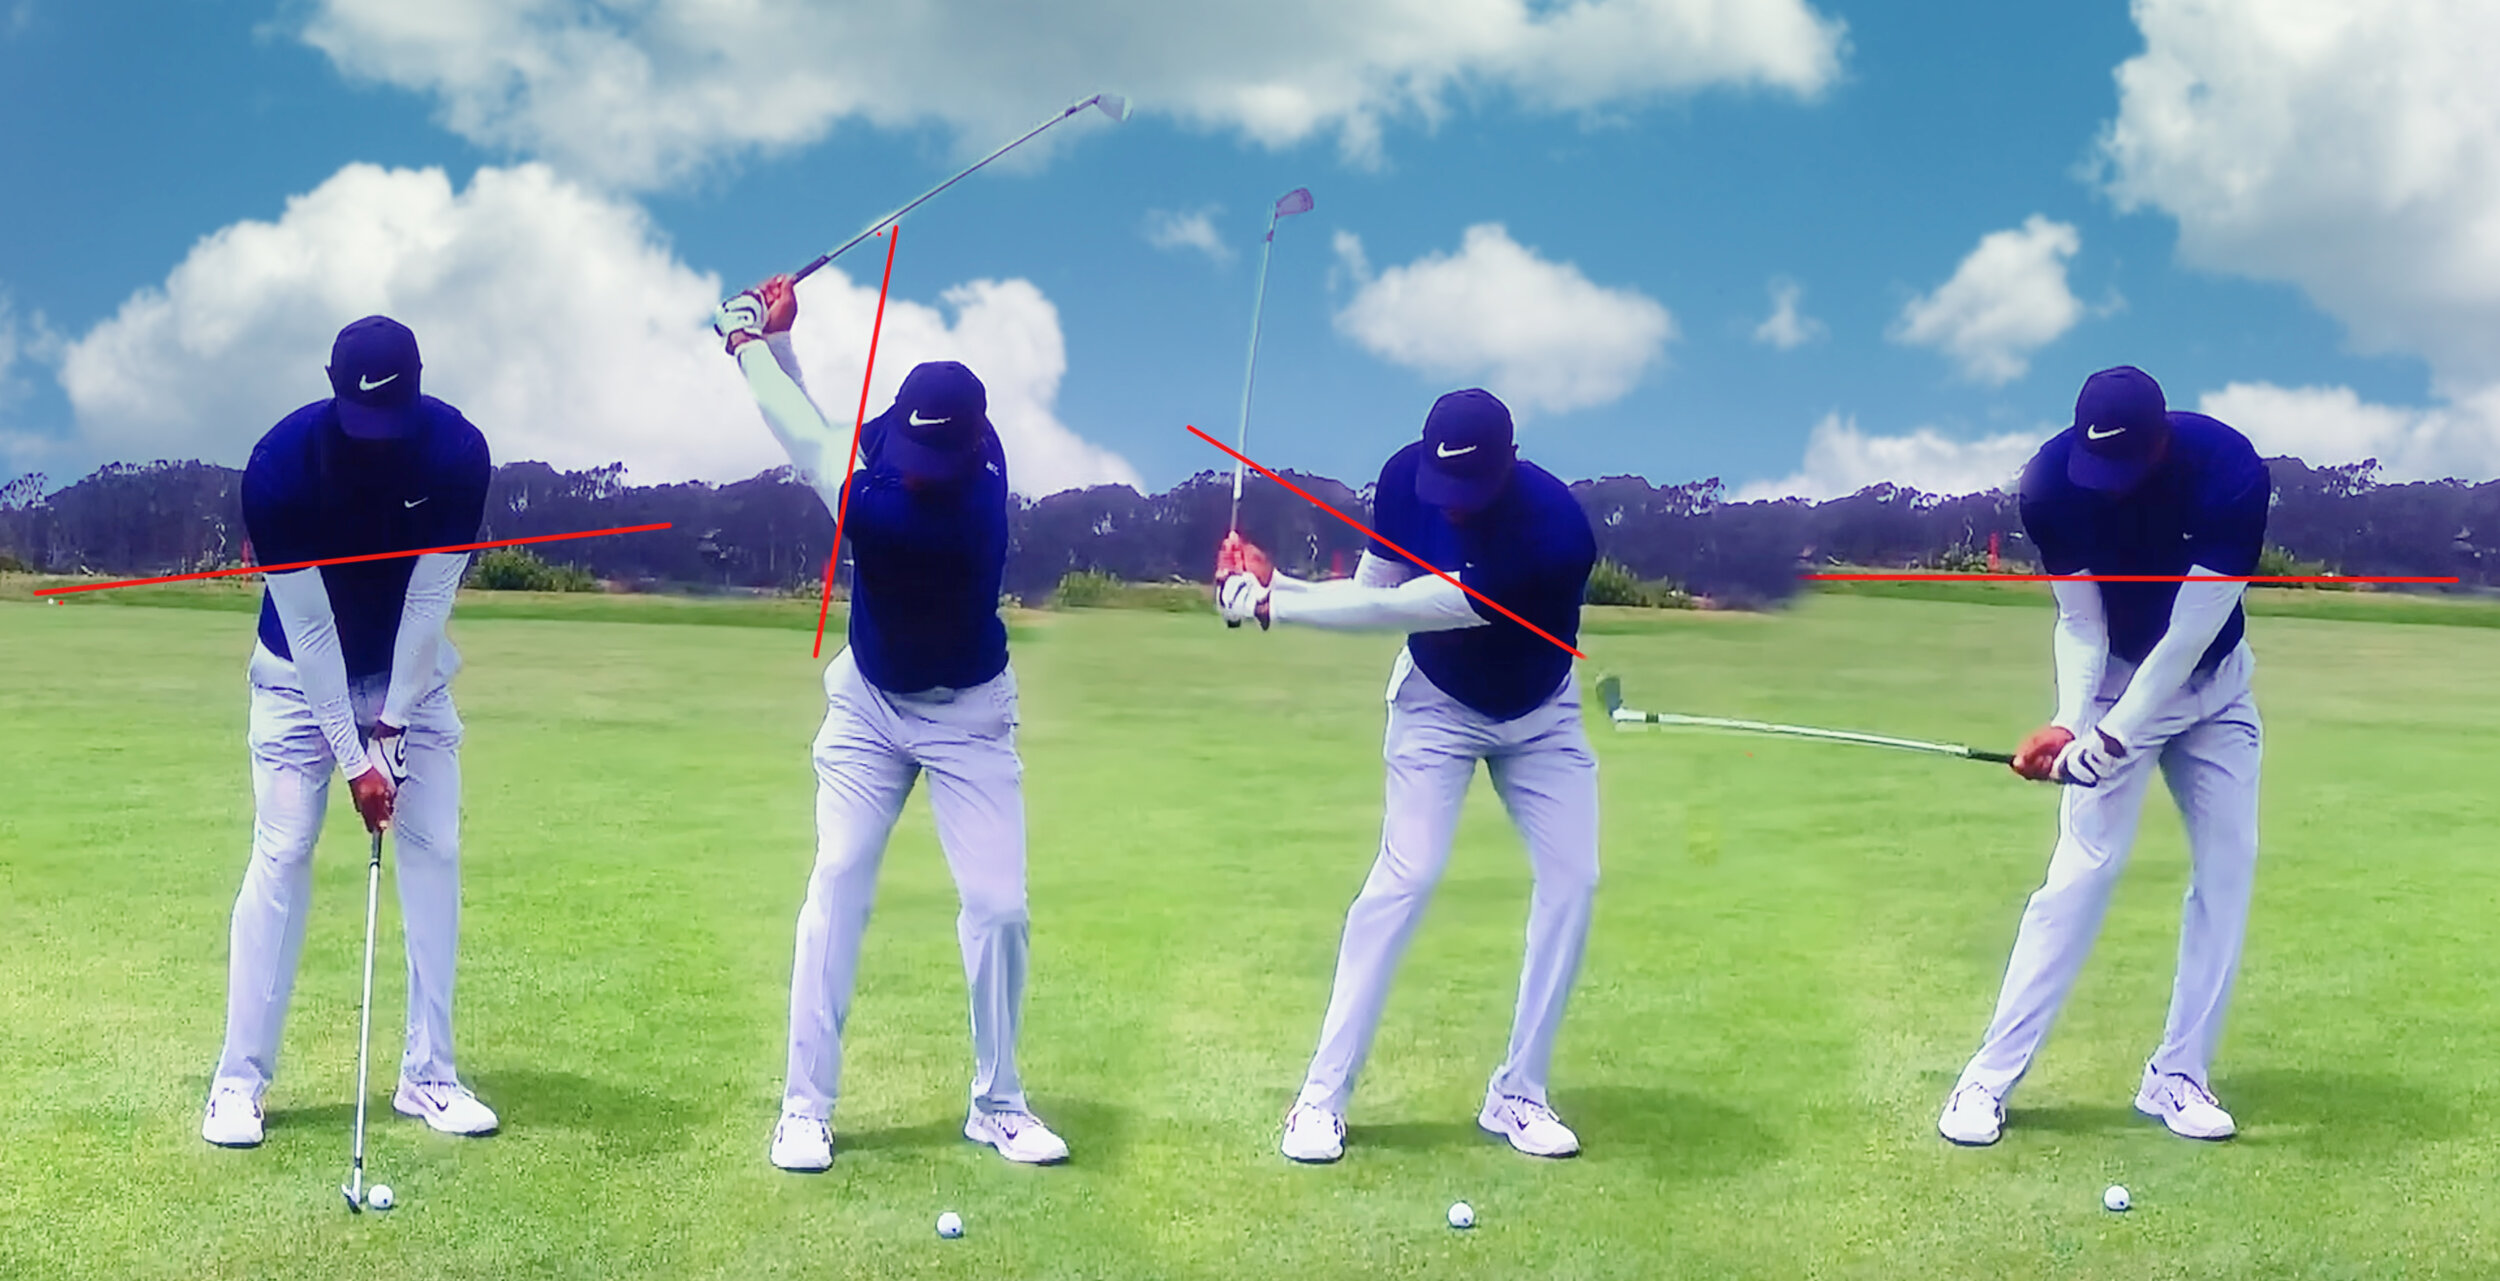
Here’s a face on shot of Tiger Woods from the PGA Championship in San Francisco. I like this example as the bottom of his sleeves seem to correlate to shoulder tilt in these frames.

Tiger Woods

Tiger Woods

Frame 1: Far too many golfers have significantly more shoulder tilt than this at address. The lead shoulder should always be higher, but only marginally.

Frame 2: It’s amazing that Tiger can turn this well after his back issues. That being said, notice how much higher the trail shoulder is than the lead. He has turned well, but perhaps more importantly, he has pivoted on a fairly steep incline with the shoulders.

Frame 3: The inclined pivot going back has aided his ability to initiate the downswing without a hint of tipping away from the target. The weight is left and the body is rotating appropriately.

Frame 4: A great checkpoint for all golfers - make sure that just before the shaft gets back to parallel to the ground, your shoulders (or sleeves) are pretty close to parallel to the ground as well. From here the low point of the arc is well forward of the ball and the player can rotate freely through impact, aiding with club face control. Better ball striking and accuracy!

Get out to the practice tee and make a few exaggerated practice swings as I demonstrated in the video above. It will, and should, feel strange, but straight away you’ll notice how the low point to the swing is now after impact and you can rotate more freely through the strike. Give it a go and let me know your findings.

Thanks for reading!