Golf instruction - what is essential to the swing and what is merely style?
Golf Blogs | Andrew Rice Golf
Golf Instruction - What is essential to the swing and what is merely a matter of style? A page for everybody who loves golf! Here I will discuss the swing, architecture, equipment, players and the general state of the game.
This is a fairly straightforward drill that will activate the trail side in the downswing and reduce any “tipping” tendency that might get the clubhead stuck behind the golfer. If you struggle with thins, and fats in tandem with blocks and hooks, then this is one for you to try.
A few points to note:
This drill works nicely with a 7 or 8 iron struck off a low tee.
Keep the stance fairly narrow and drop the trail foot back about a foot inside where you’d normally place it.
Rehearse and then rehearse again. Remember that as you practice this you’re trying to make technical changes, so go slowly and get it right….every time!
Try to feel the trail shoulder continuously moving through the impact zone. It should feel as if you’re “covering” the ball with that trail shoulder.
As you get more comfortable you can start to pick up the speed and move the back foot into a more neutral position.
This drill really has worked wonders for a few of my students in that it has upgraded both the quality of strike along with the ball flight. The next time you find yourself struggling with either strike or trajectory give this drill a try. I think you’ll be pleasantly surprised.
Most of us should be working towards better rotation through impact. One of the biggest differences I see between the everyday golfer and the pros is the amount of hip rotation that has occurred at impact. What I call the “two cheek” impact position where both butt cheeks are visible from down the line at impact. This drill will help! Take a look…
Notes:
Grab an 8 or 9 iron and set up to the ball which initially should be on a tee.
Wind about halfway back into the backswing and pump down to where the shaft is approximately parallel to the ground. Here you should feel your chest and hips as open as you can possibly get them.
After a few rehearsals give the ball a light hit and slowly build up speed while incorporating this sense into full speed swings.
Let’s keep in mind that in order to be able to rotate more freely through impact is largely an indicator of the clubhead and club face being in an acceptable position in the early part of the downswing. If your club face is wide open and you try to rotate more through impact there’s a strong chance you’ll actually hit the ball worse! Start with getting the clubhead deep in the early downswing and the club face fairly strong - from there this drill will work wonders for your ballstriking.
Thanks so much for watching/reading along. I hope that in some small way I am able to contribute to the joy you experience out on the links. Until next time…
Too many golfers that I teach are struggling to compress the golf ball! There is a distinct lack of energy being transferred from the clubhead to the ball. Getting the club face in position in the early part of the downswing is tremendously helpful in increasing compression and the sizzle factor off the face. Here’s how…
When trying this drill look for the following:
Don’t try to hit balls with this - it’s all about getting the correct feel
Hold the club at the bottom of the grip in your lead hand with the clubhead well off the ground
As you get to the top you should see the handle out in front of your forearm
Doing this drill correctly will ensure that you’re getting both the club face and the clubhead in a good spot to initiate the downswing without having to work hard to shallow the club or lay the shaft down.
This should be your view when you have the club at the top of the backswing. Give it a try and see if you can incorporate the feel into your next practice or warm-up session.
Thanks for reading/watching along and it is my wish that somehow I can manage to share something that helps you experience more joy while you’re out on the links.
The ability to control both the face angle and loft at impact is paramount to playing better golf! This element in the golf swing really plays a major role in my teaching philosophy. Here’s a simple, yet illustrative, video that shows what can go wrong and how it needs to work…
So much of what we do in our golf swings is dictated by the face angle in the early part of the downswing. An open face means a stalled pivot and handle to go along with too much loft and an inconsistent strike. On the other hand an overly closed face will encourage too much lateral drive in the downswing and cause the hands to ultimately be too far forward and de-loft the face too much. This image illustrates the two extremes…
If you can make, even subtle, upgrades during this all important part of the golf swing you’re going to see a marked improvement in both your ball-striking and flight. Give it a go!
We’ve all been there - a constant battle between fats and thins, blocks and sweeping hooks! This malady is something I experience all too often on my lesson tee and I have an idea that I know will help many of you. Once you work your way through this article your approach to ball striking, your concept of how it should work, will never be the same again. Take a look…
I have come to believe that the primary culprit in tipping the upper body back is the quest to work the clubhead back to the inside or shallow the club on the downswing. I’ve written that “It’s All About Impact”, but you can only arrive at an appropriate impact when certain elements are in place going back and on the way down. The better the clubhead is positioned in the early downswing the less likely golfers are to tip their shoulders and spine away from the target too early.
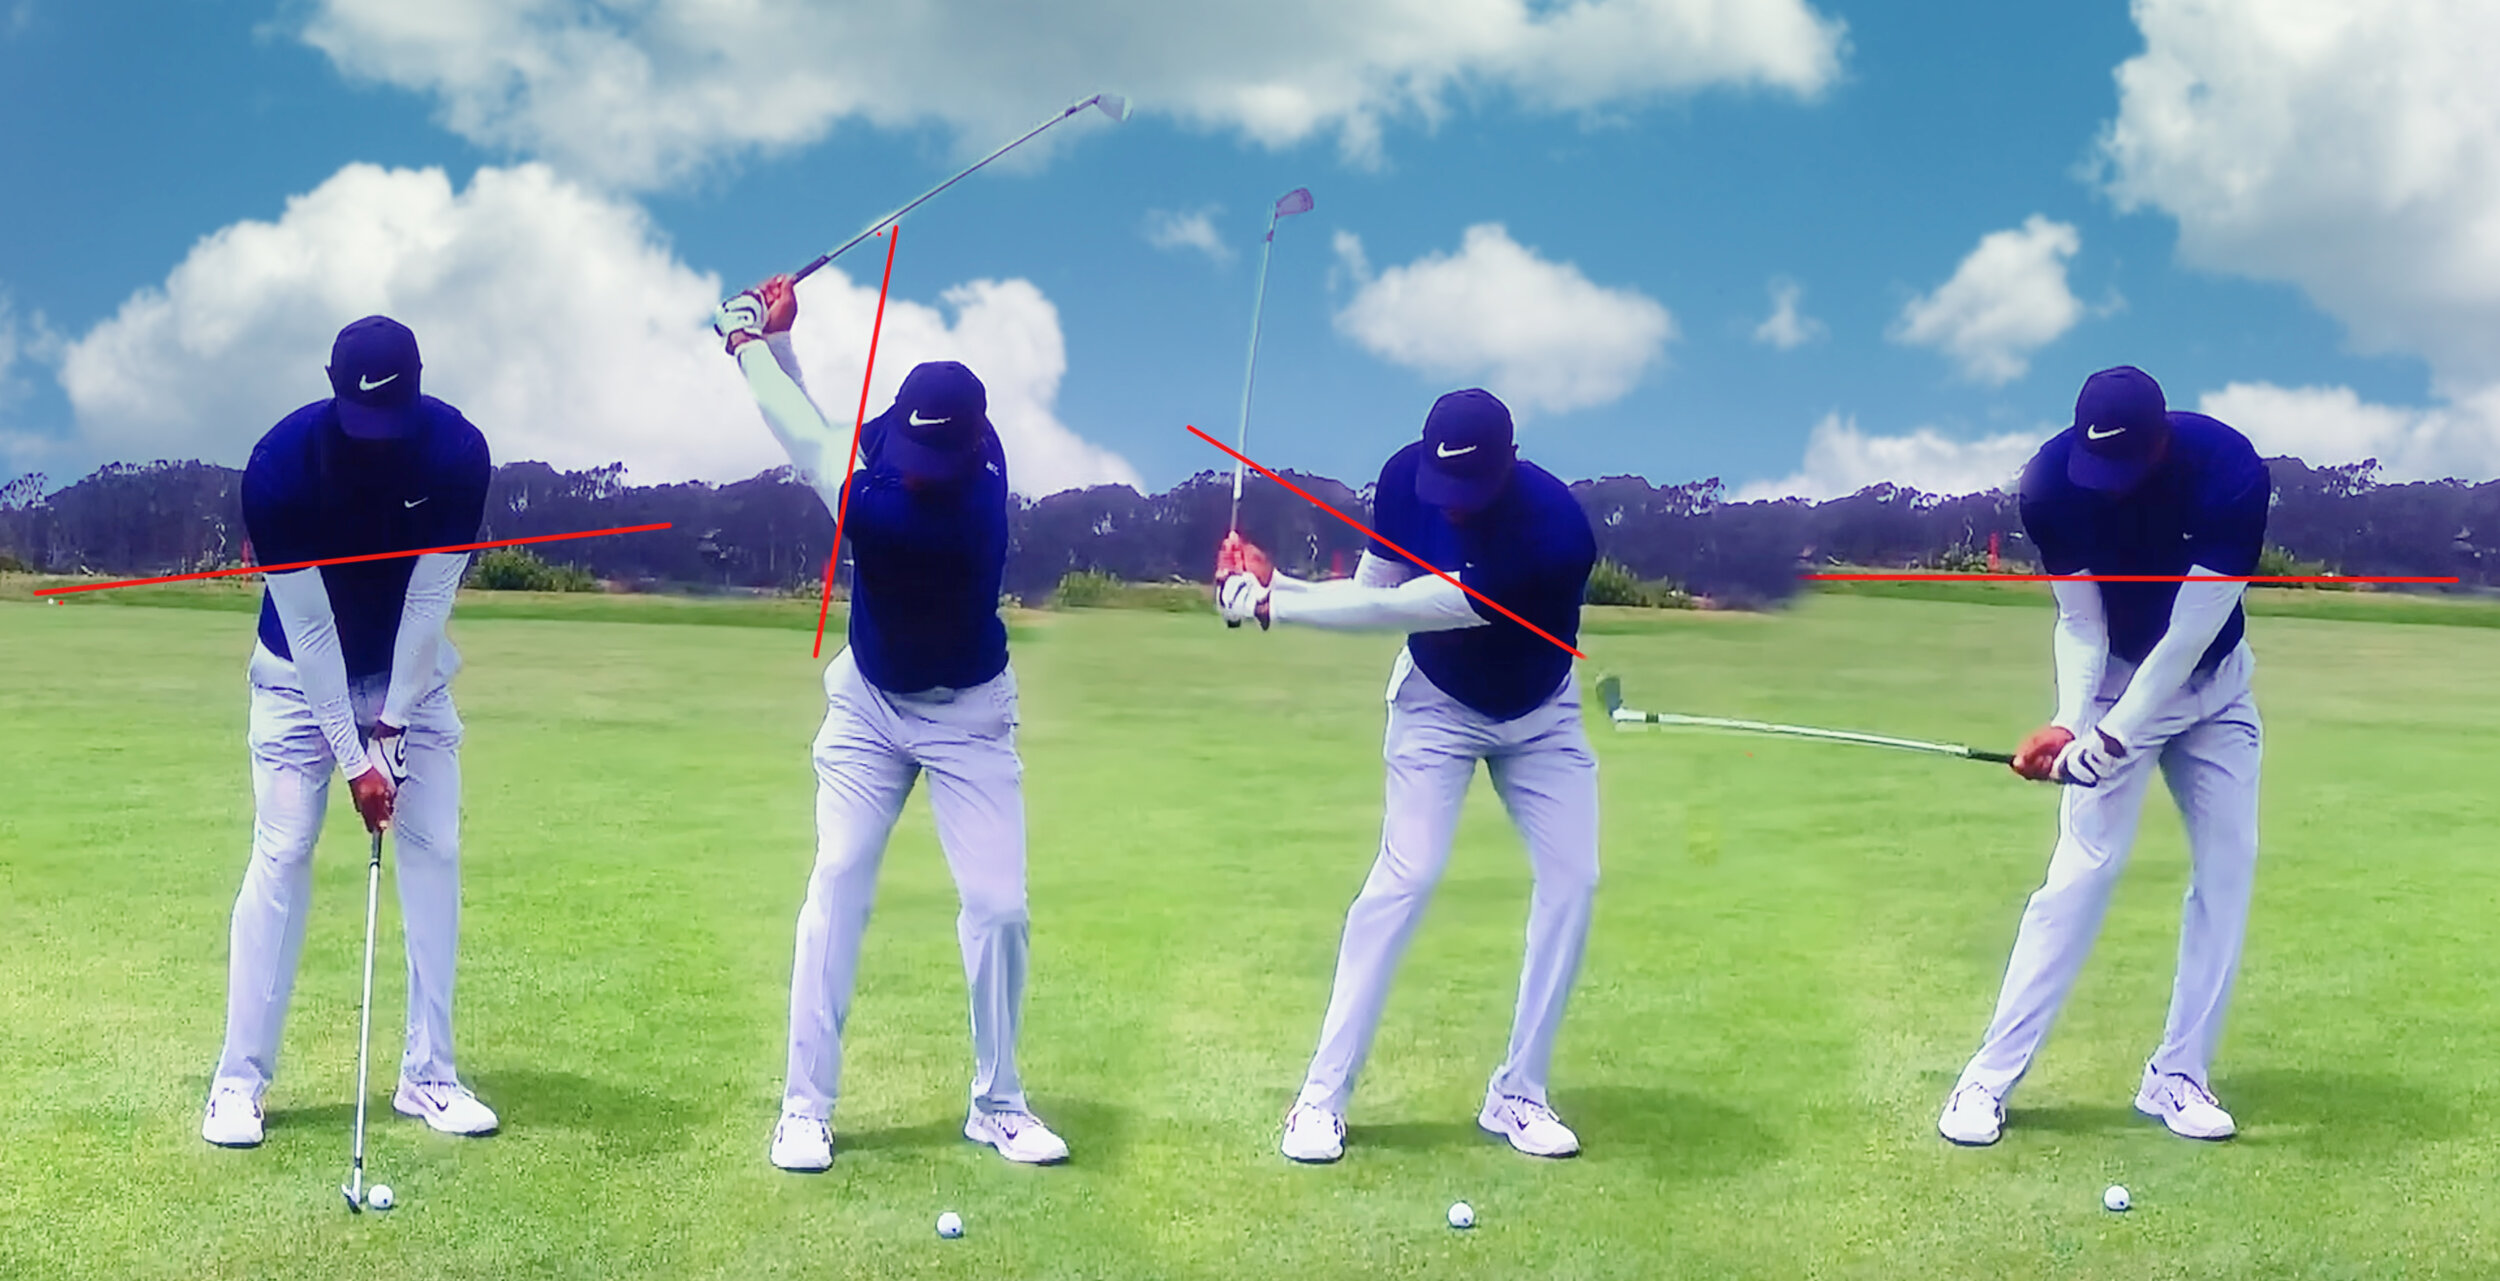
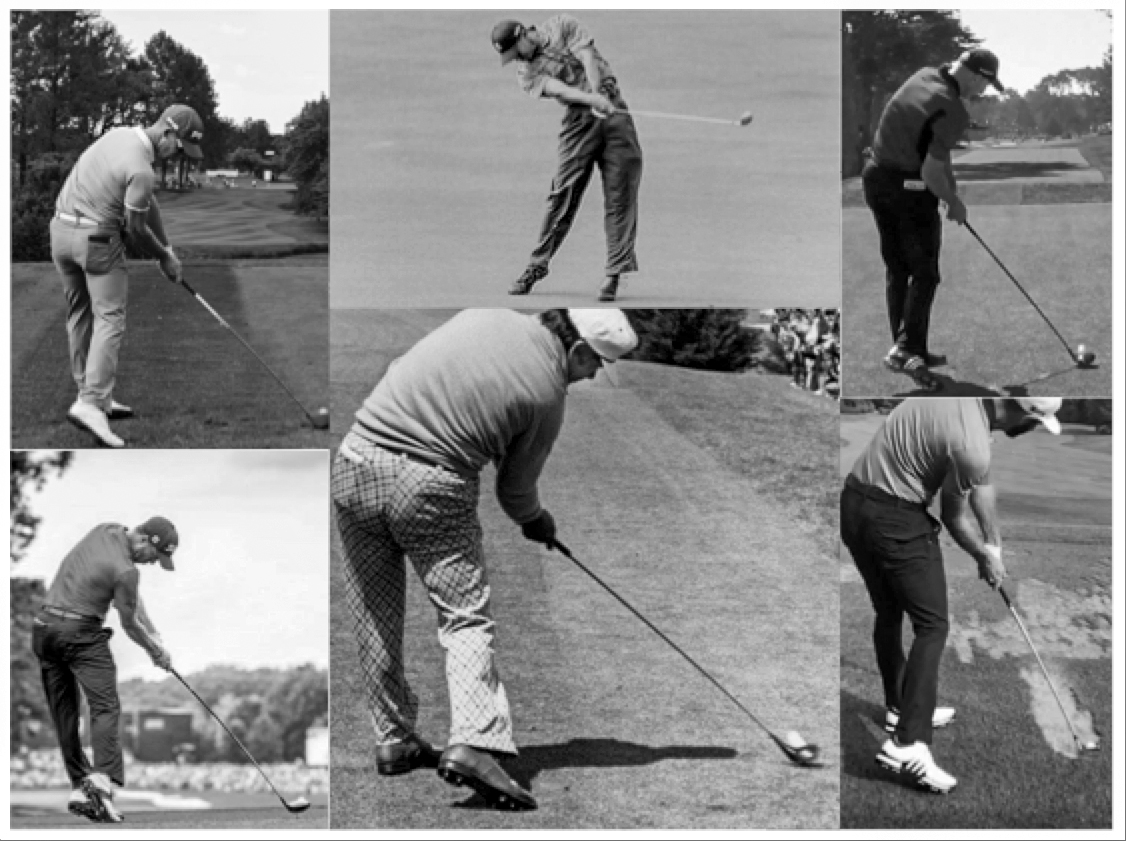
Here’s a face on shot of Tiger Woods from the PGA Championship in San Francisco. I like this example as the bottom of his sleeves seem to correlate to shoulder tilt in these frames.
Tiger Woods
Frame 1: Far too many golfers have significantly more shoulder tilt than this at address. The lead shoulder should always be higher, but only marginally.
Frame 2: It’s amazing that Tiger can turn this well after his back issues. That being said, notice how much higher the trail shoulder is than the lead. He has turned well, but perhaps more importantly, he has pivoted on a fairly steep incline with the shoulders.
Frame 3: The inclined pivot going back has aided his ability to initiate the downswing without a hint of tipping away from the target. The weight is left and the body is rotating appropriately.
Frame 4: A great checkpoint for all golfers - make sure that just before the shaft gets back to parallel to the ground, your shoulders (or sleeves) are pretty close to parallel to the ground as well. From here the low point of the arc is well forward of the ball and the player can rotate freely through impact, aiding with club face control. Better ball striking and accuracy!
Get out to the practice tee and make a few exaggerated practice swings as I demonstrated in the video above. It will, and should, feel strange, but straight away you’ll notice how the low point to the swing is now after impact and you can rotate more freely through the strike. Give it a go and let me know your findings.
I recently gave an old friend a lesson. Having not taught him for a few years I had an inkling as to what to expect, but things came together so well I thought the information might be beneficial to more than just one student.
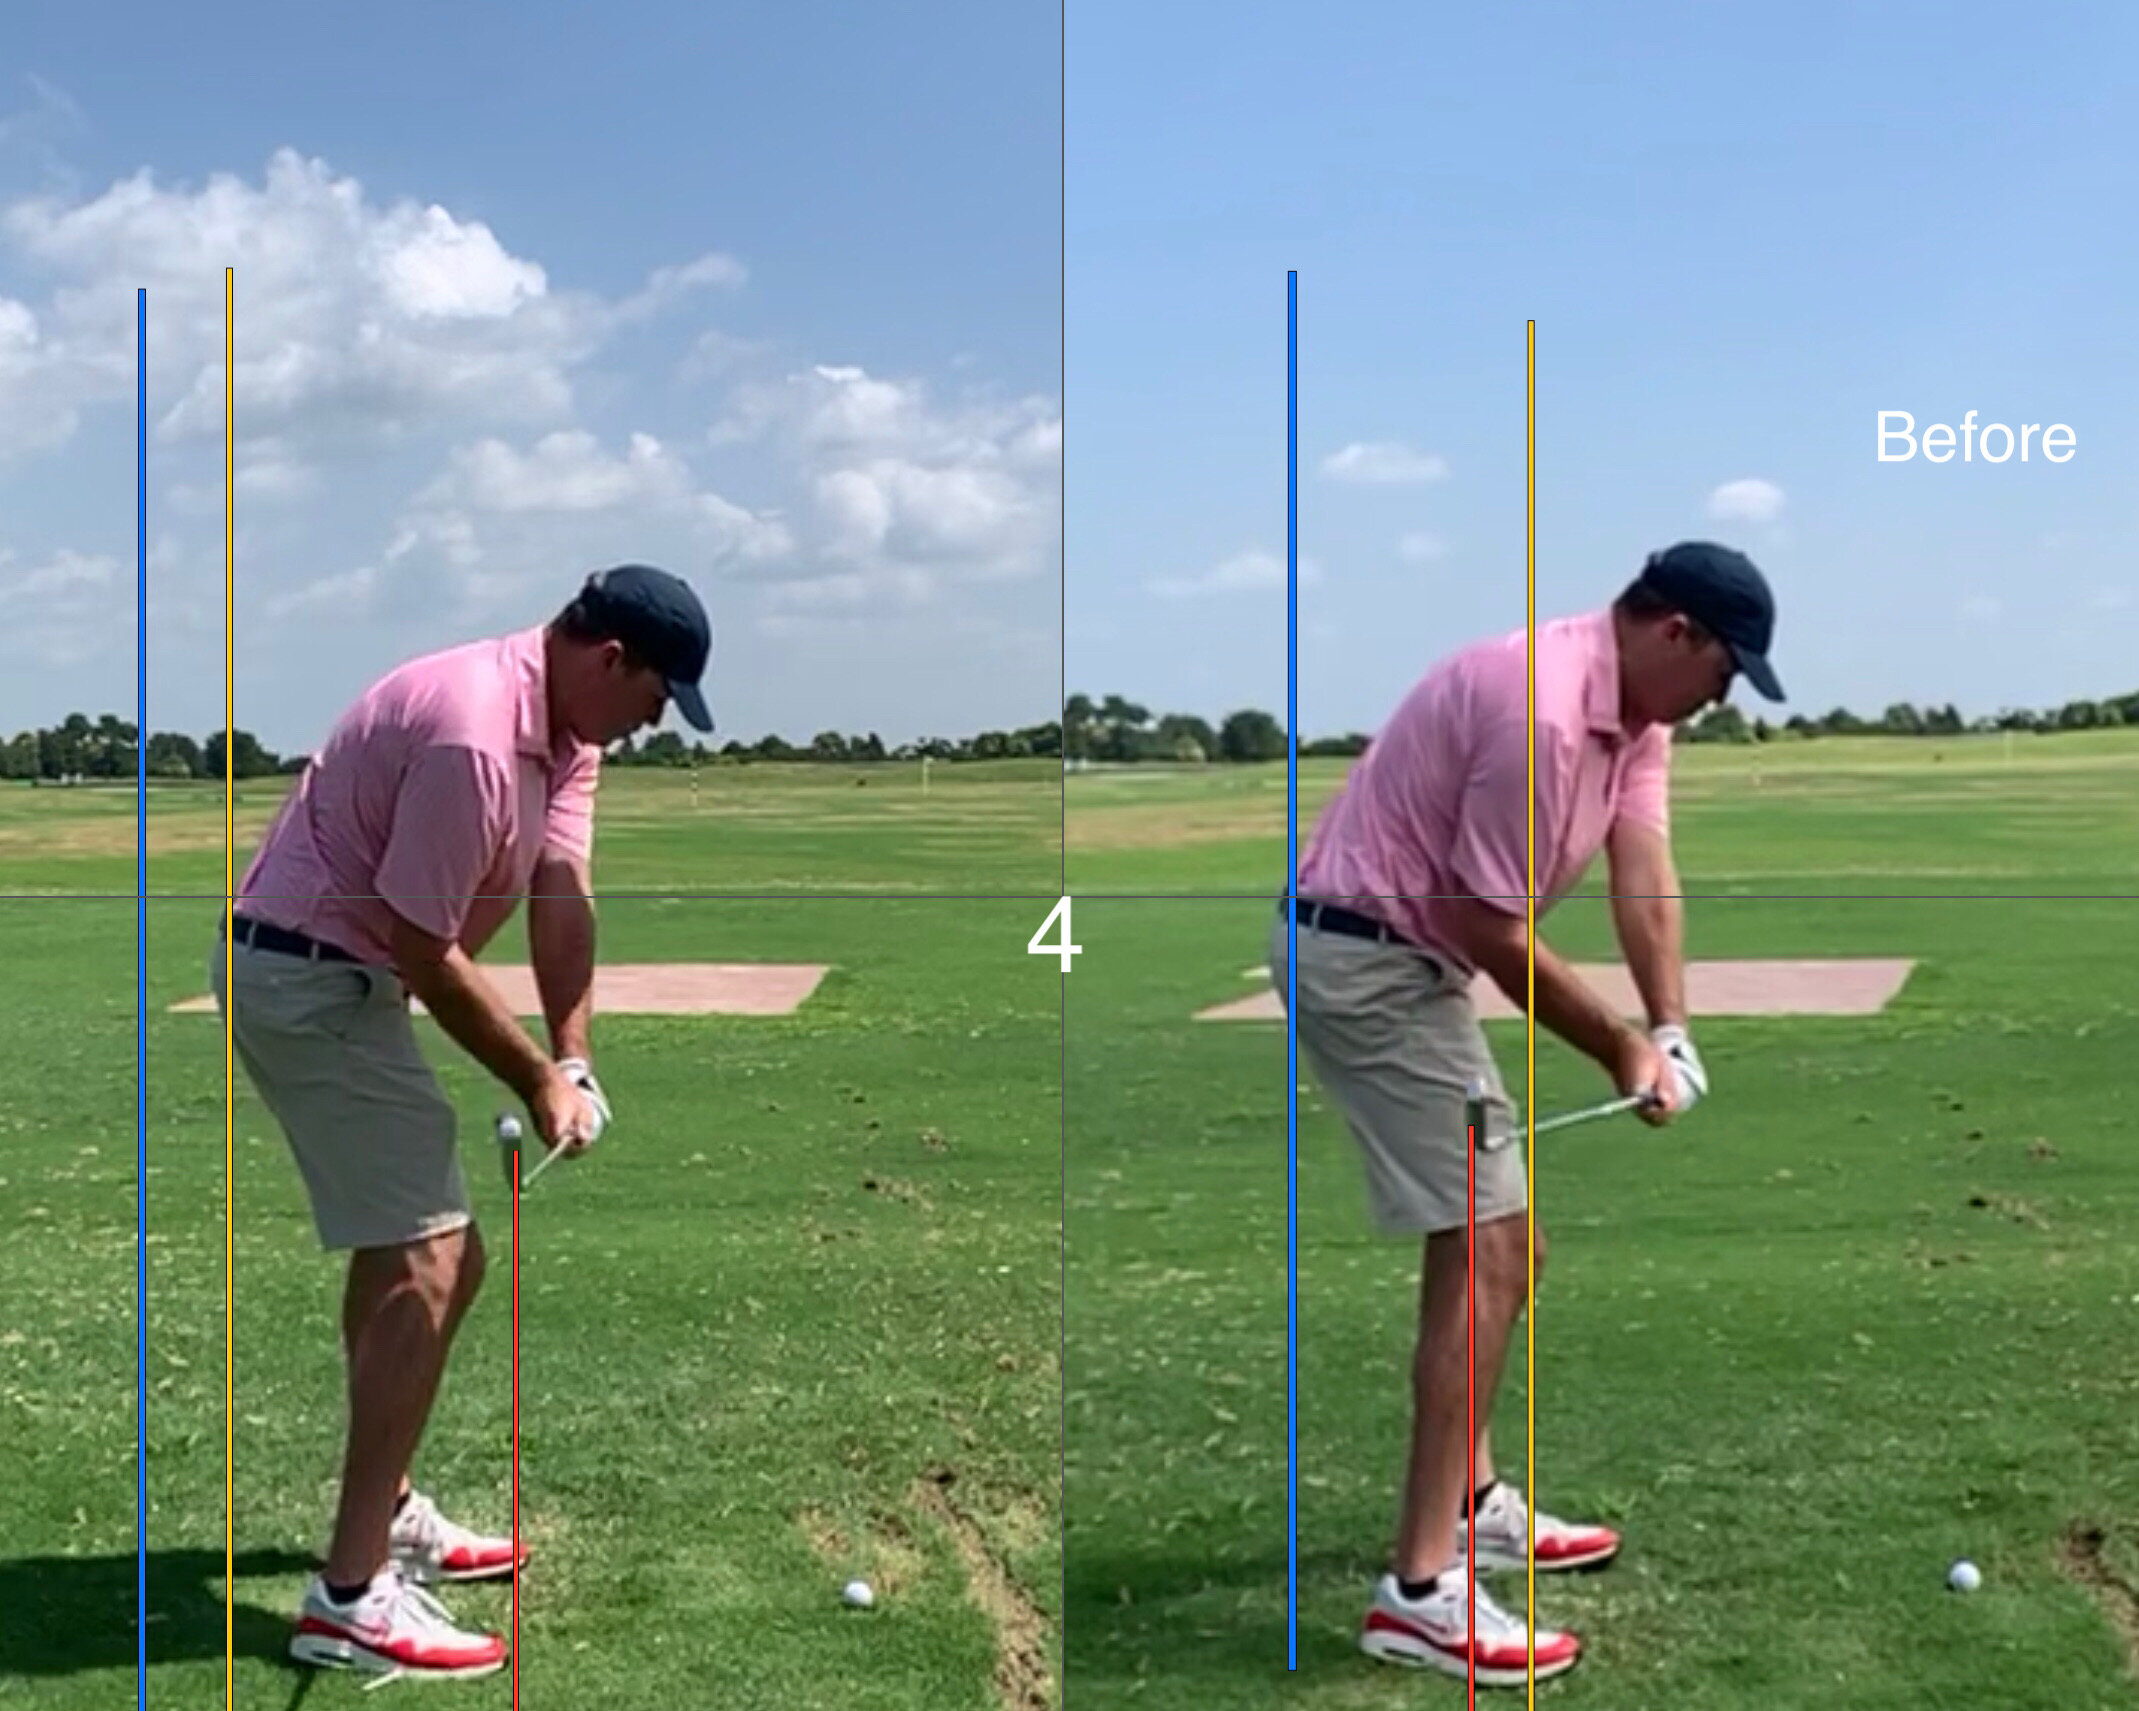
This is why looking at still frames of an athletic motion can be deceiving. There are six different images/videos here that we will go through in a specific order. To get the most out of this post please make sure you go through this it slowly. Be sure you comprehend each image before moving to the next…
(The original/before is always on the right in all of the images/videos)
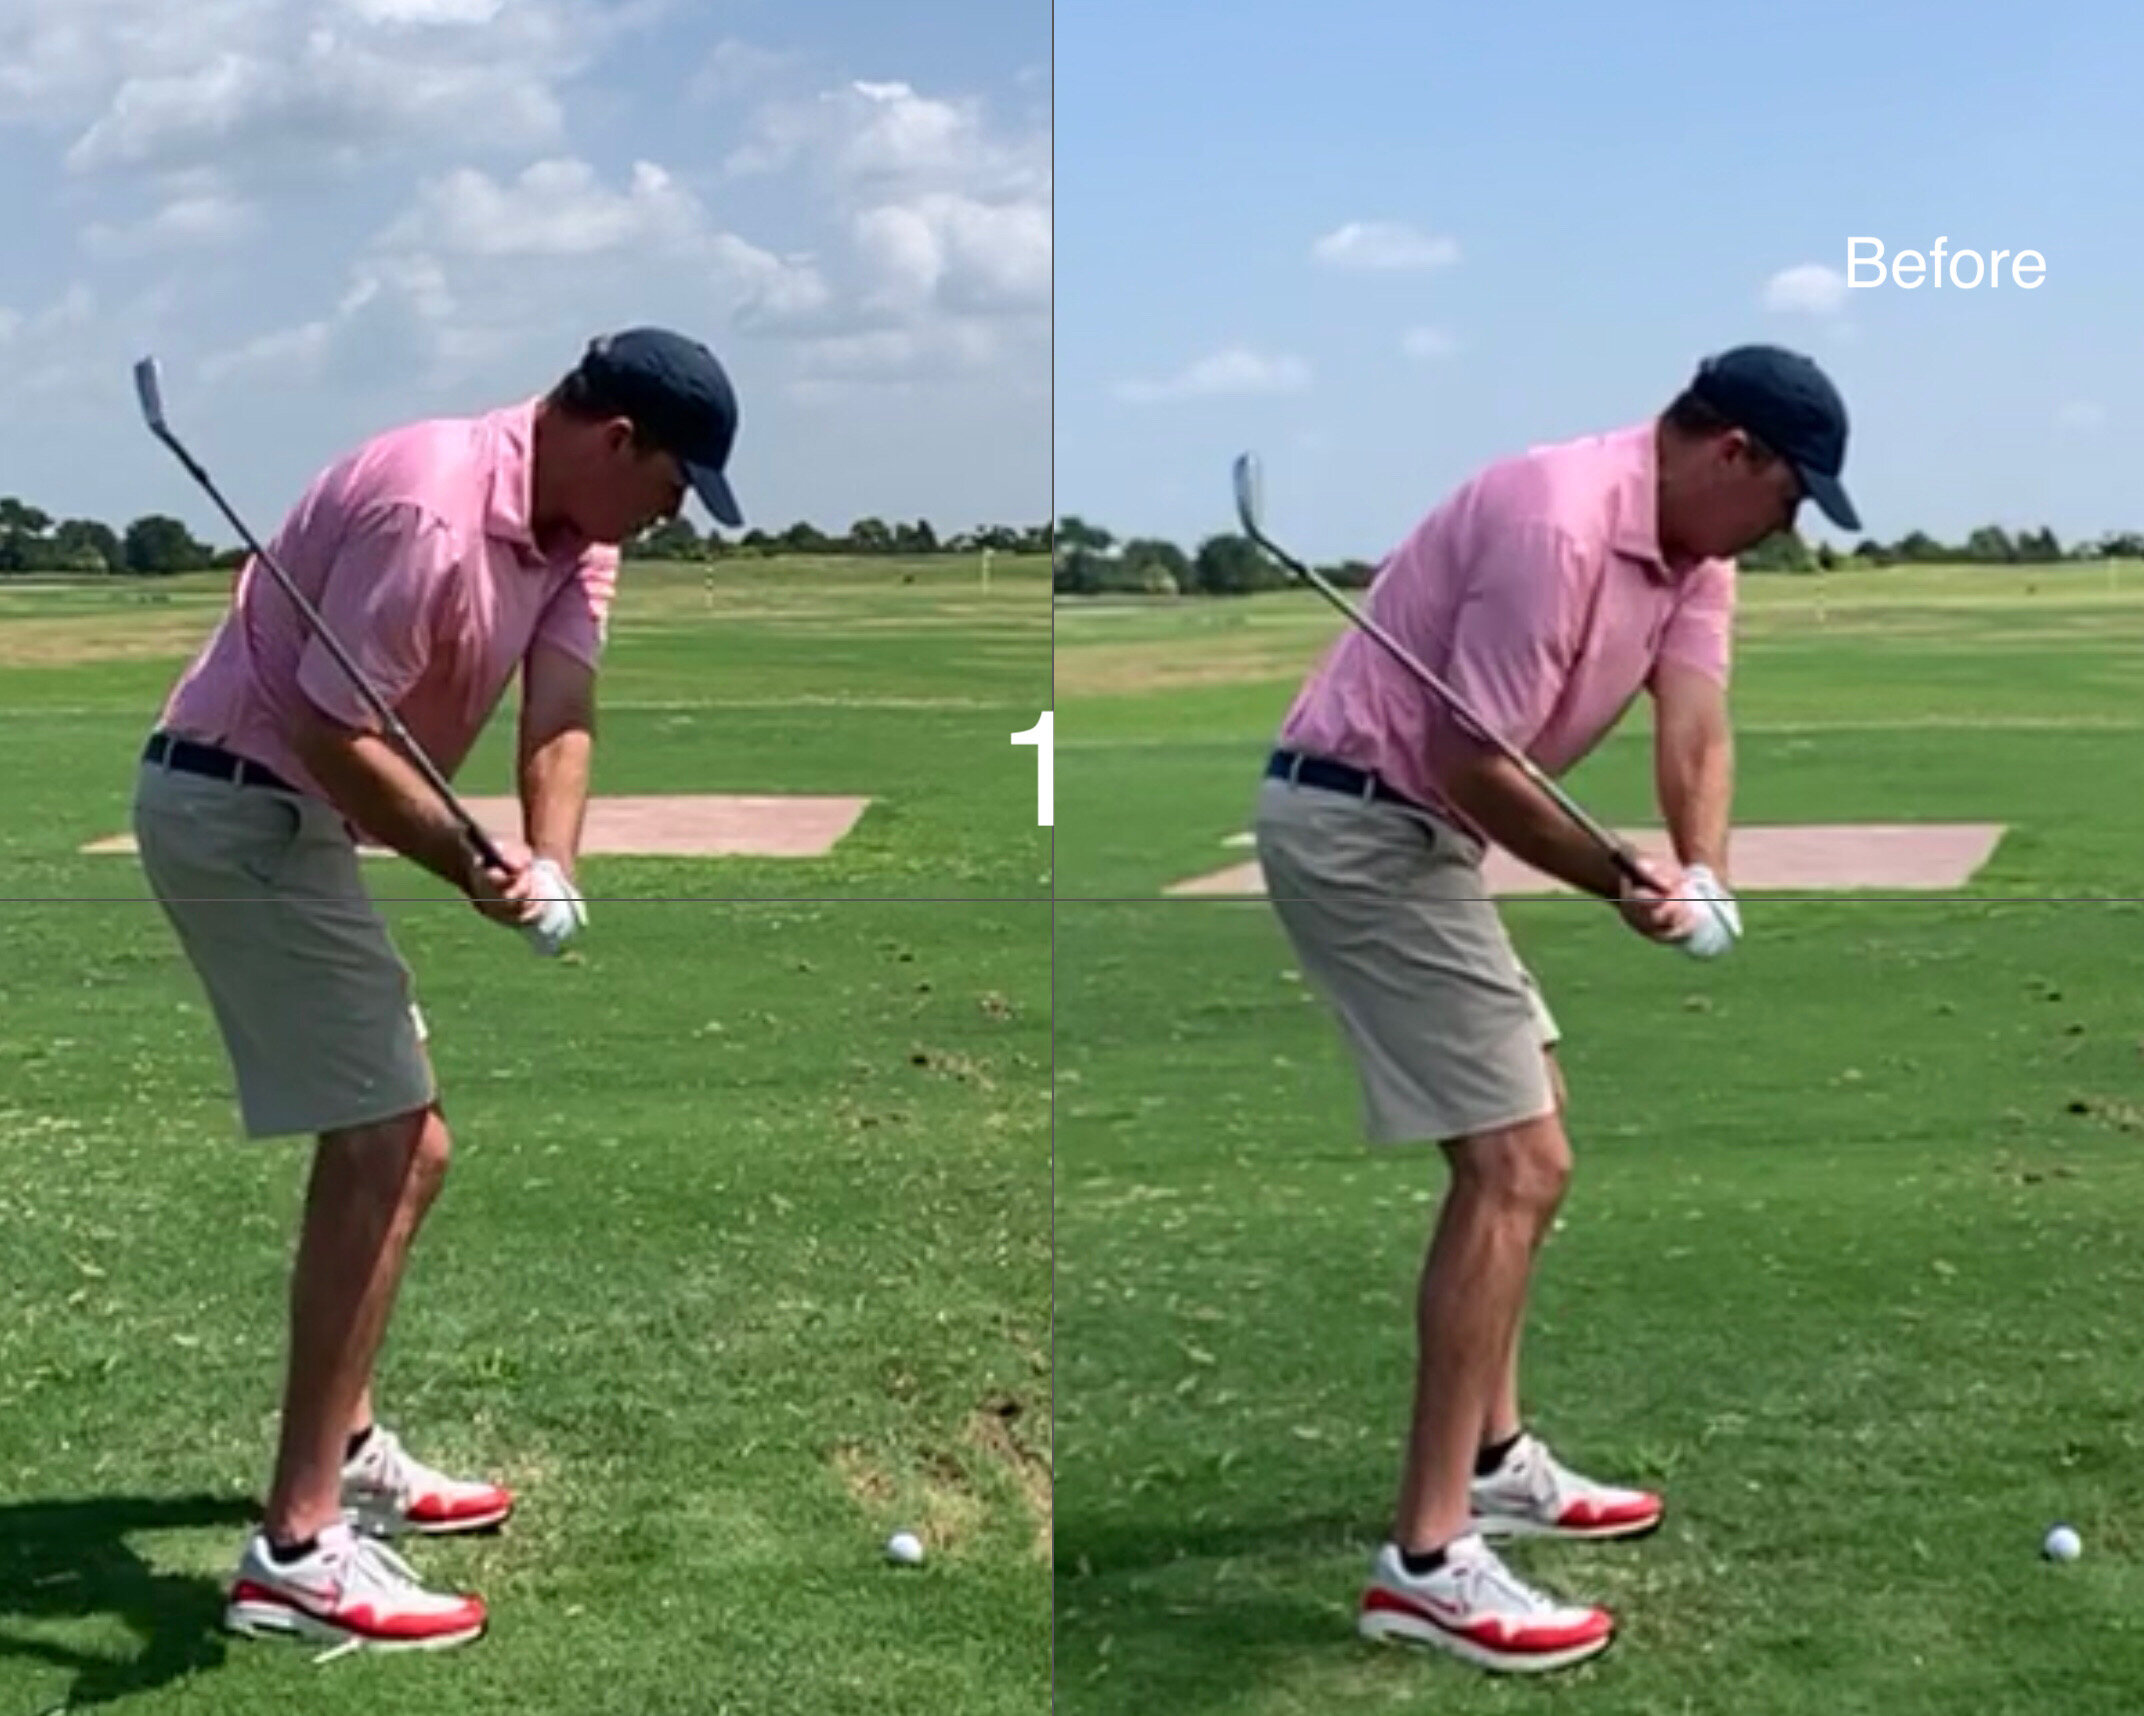
Image 1:
Notice how these two images appear to be somewhat similar. I think many of us would give them both a thumbs up! They might be somewhat similar, but the outcomes are very different due to the unseen forces being applied to the club. Do not be deceived!
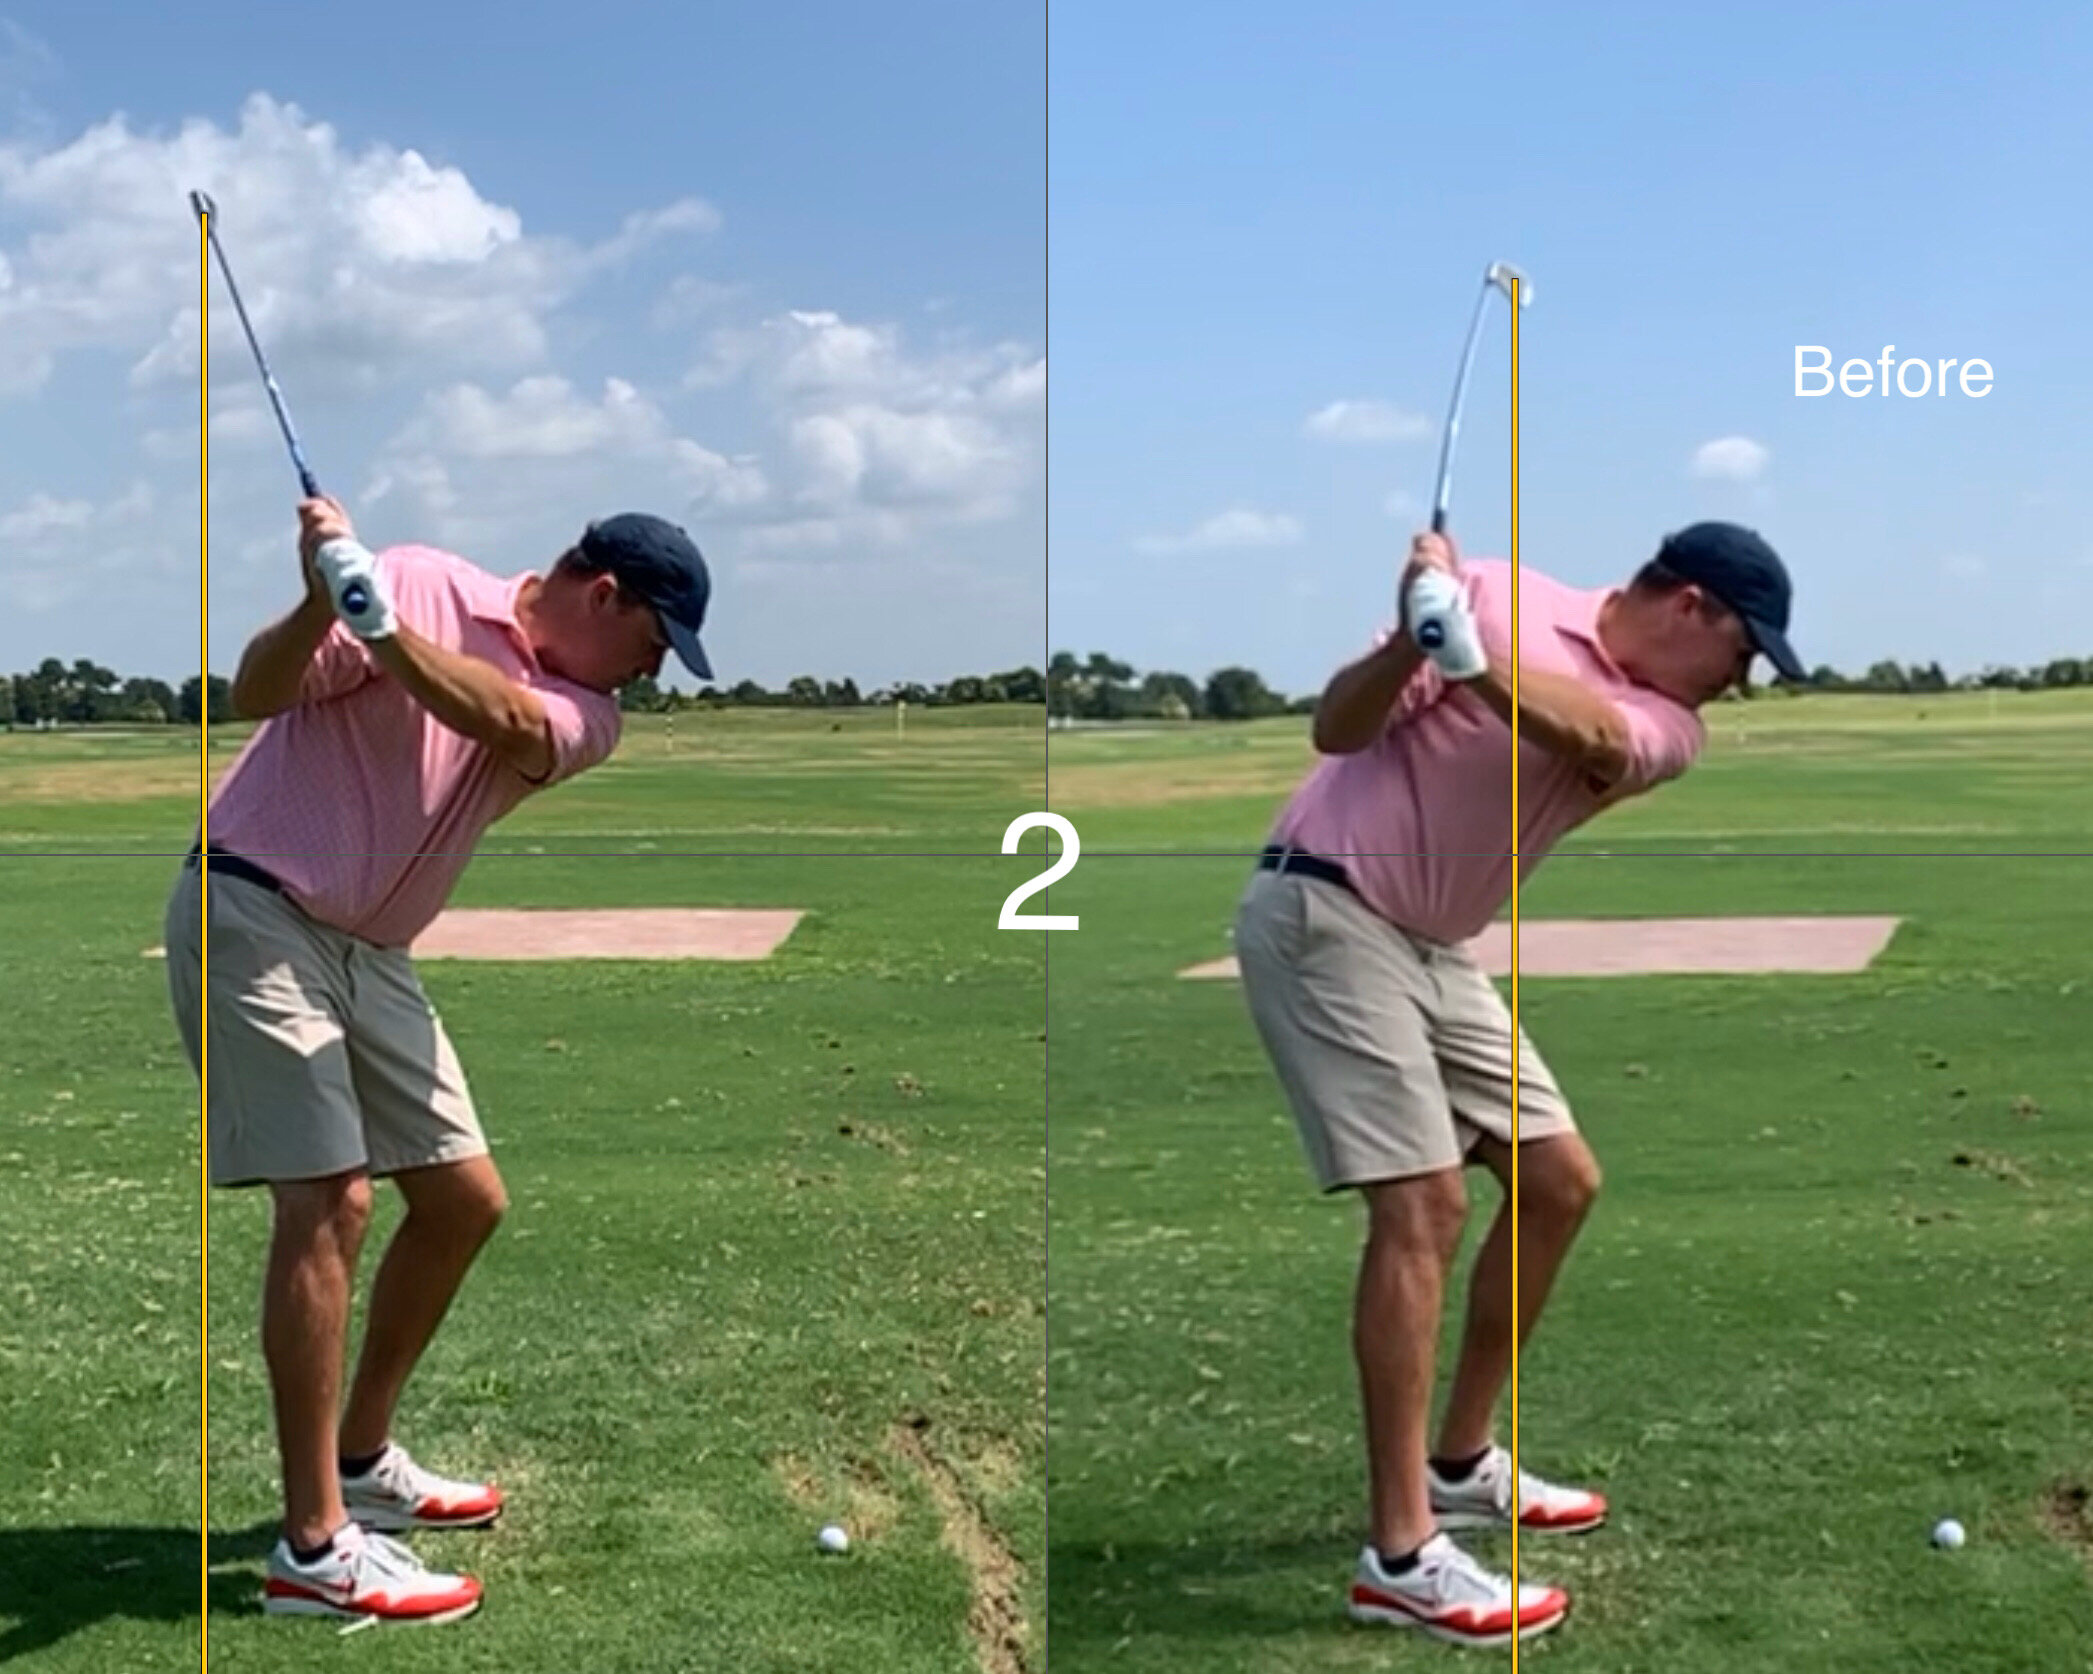
Image 2:
The player at the top of the backswing. The yellow line indicates where the sweet spot is relative to the feet and the golf ball. Notice that in the ‘after’ version the club head is significantly further to the inside than the original. This is shown by the distance between the line and the golf ball.
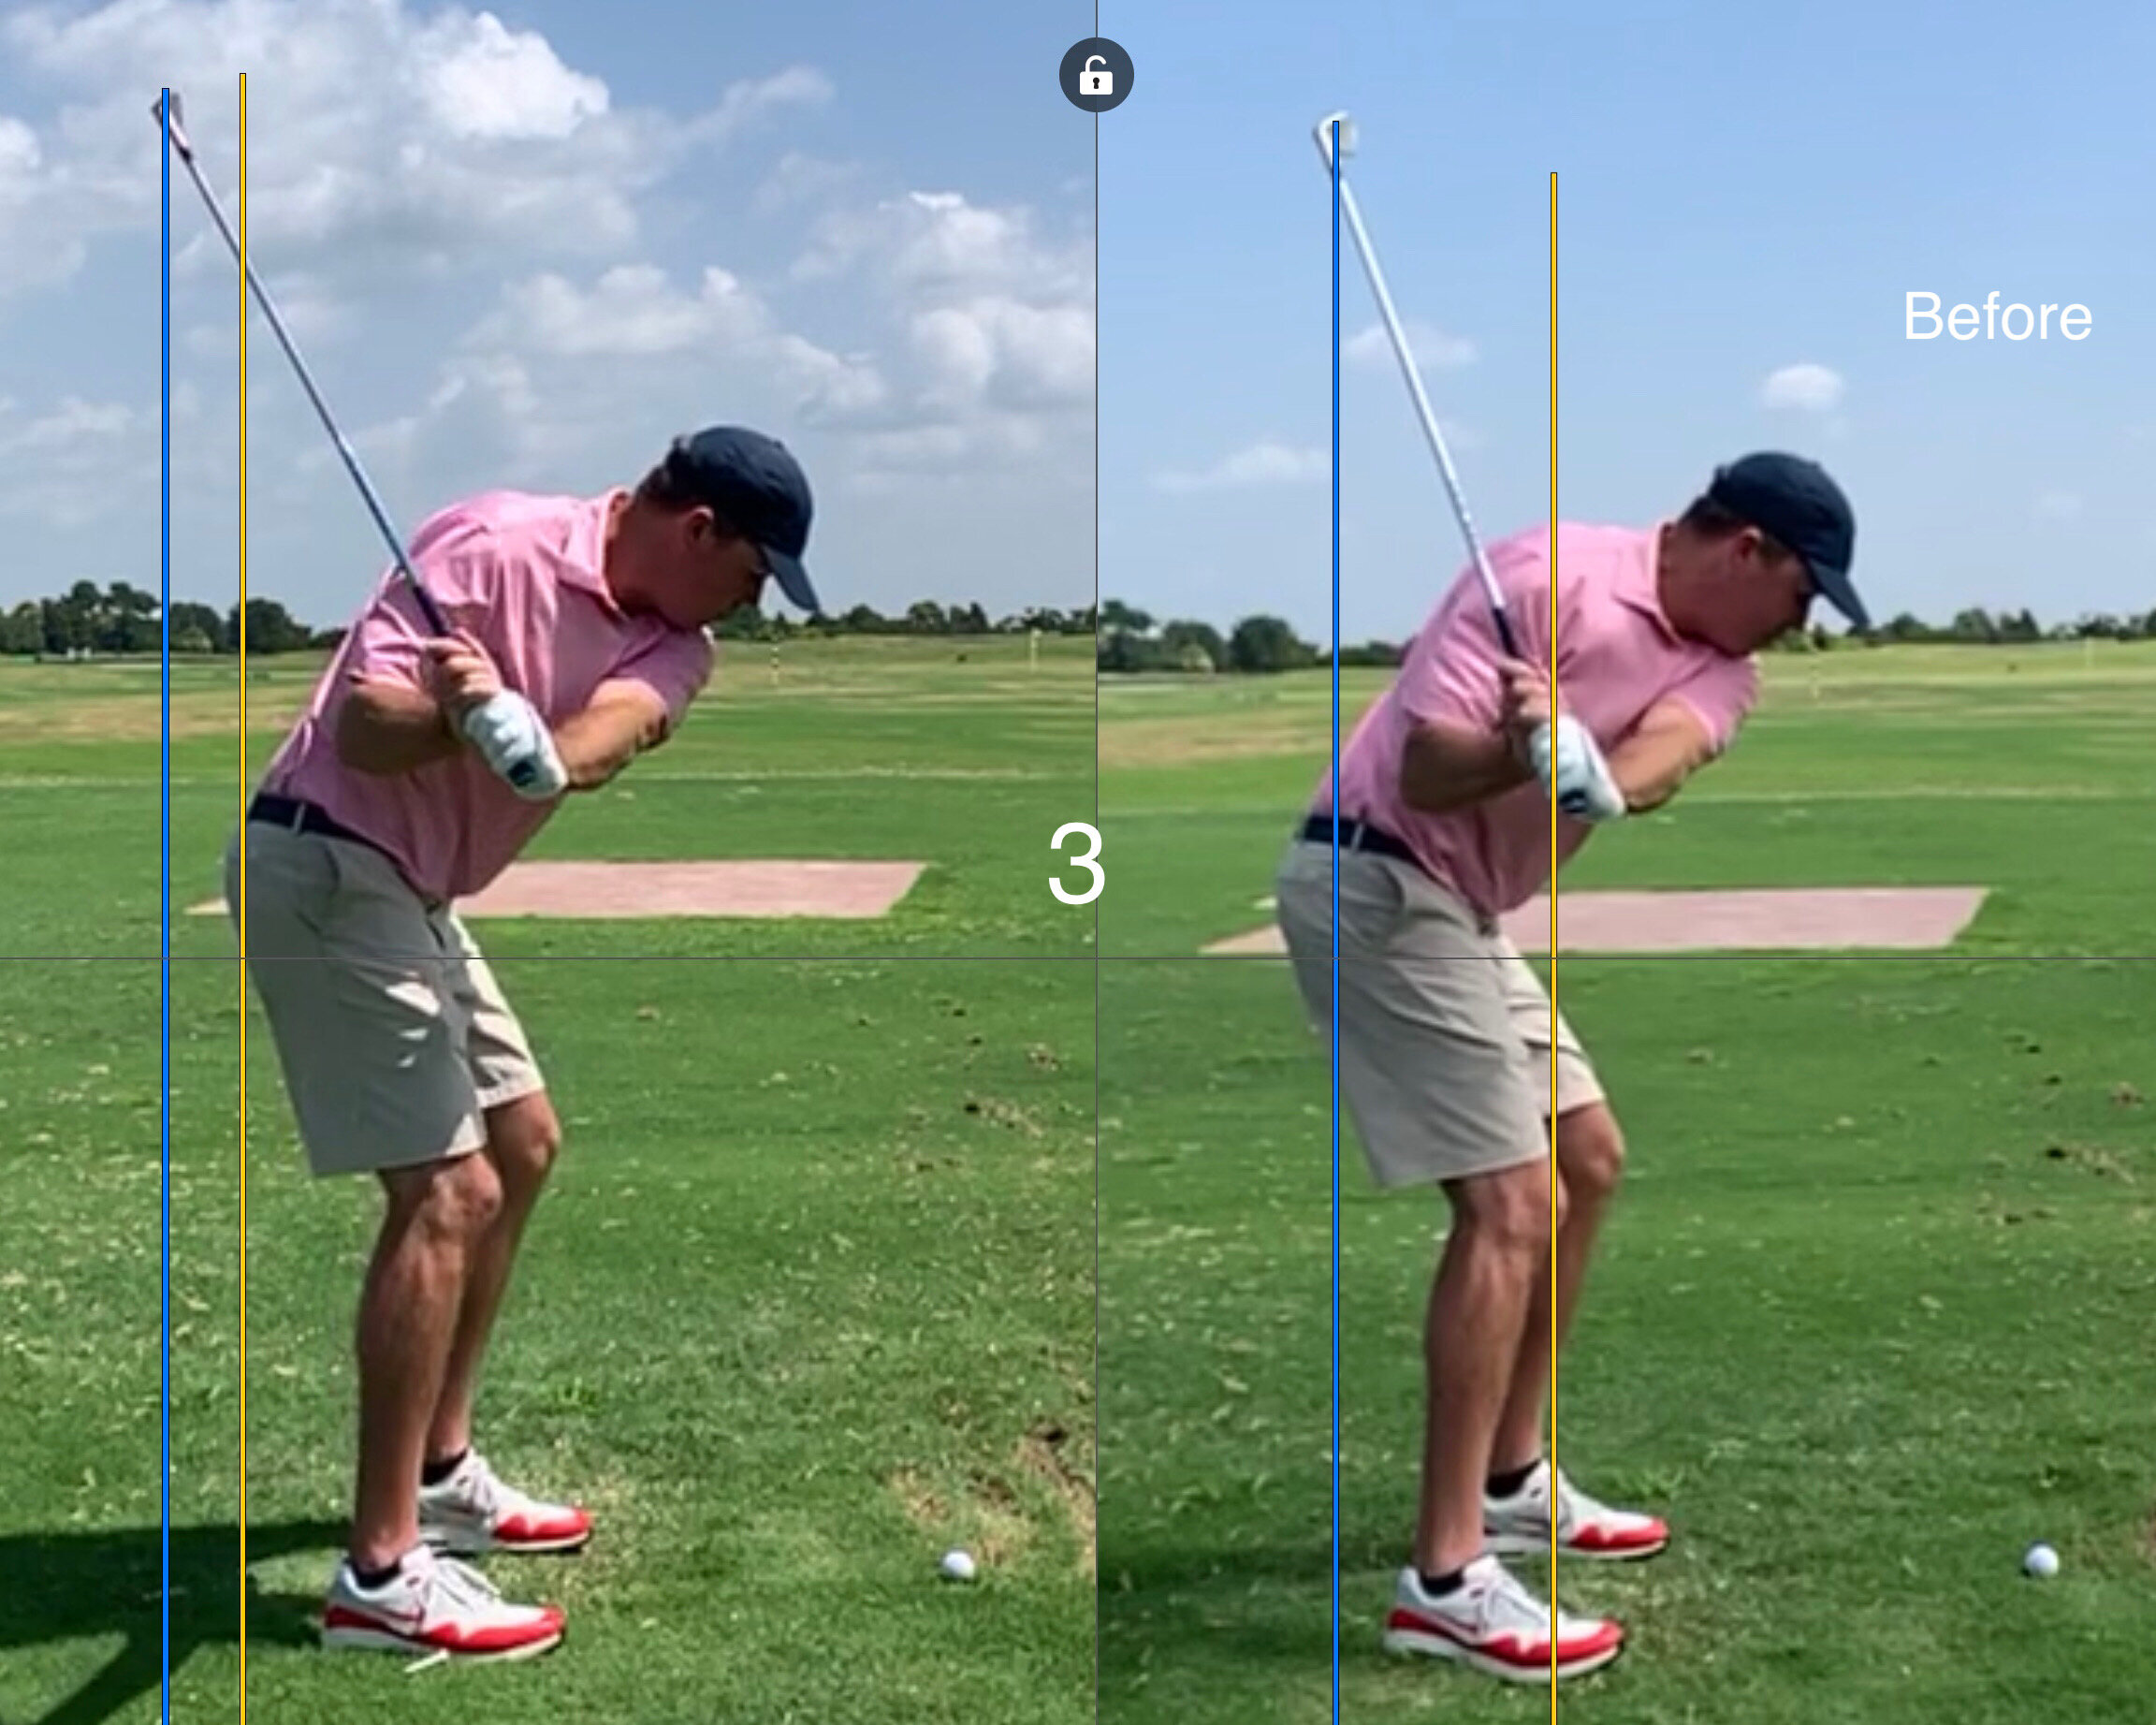
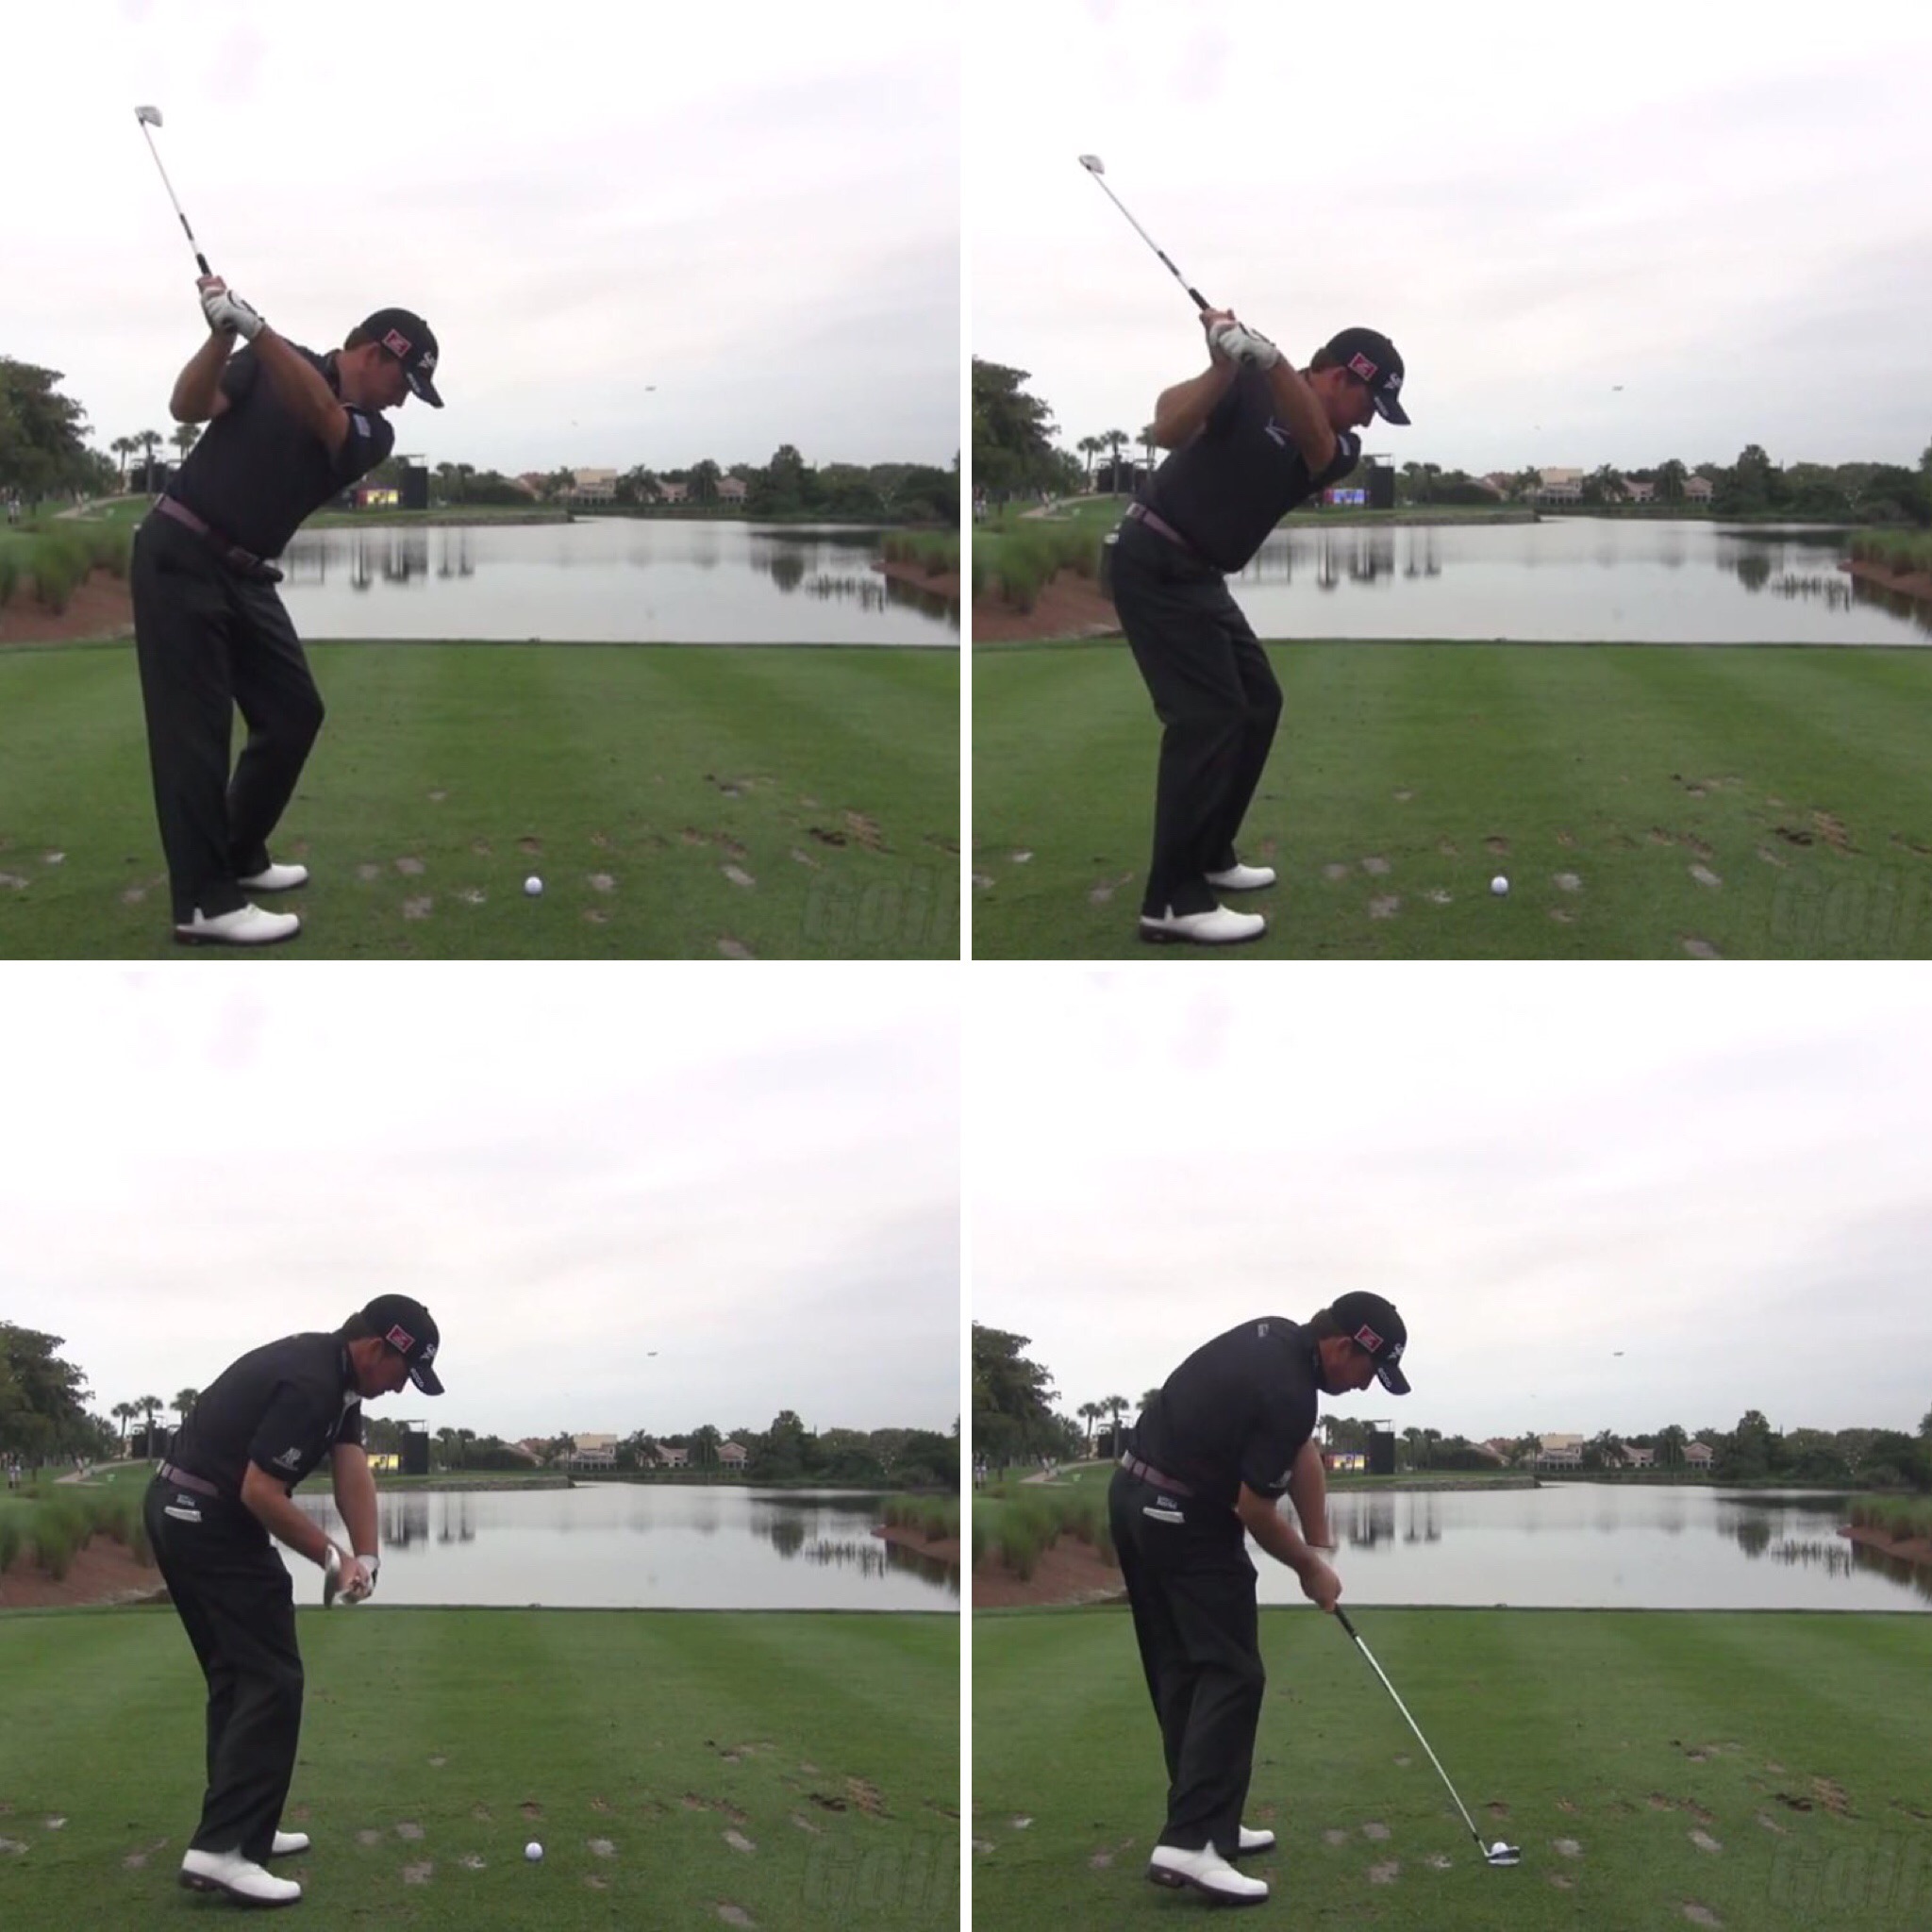
Image 3:
At approximately lead arm parallel to the ground notice how the golfer has had to force the club head to lay down on the before side. This is indicated by the difference in gap between the yellow and blue lines. Not much difference here, but the force the player is exerting on the club is very different here.
Image 4:
This is where the difference starts to show. On the right side you’ll notice that the excessive, yet necessary, lay down force has bled over and now has the club head in a position where the path will be too far out to the right, strike quality will be compromised and the player is dealing with blocks and hooks. Notice how the gap between blue and red line on the left is greater on the left side. That’s due to the fact that the golfer is free to rotate instead of having to force the club head to the inside in the downswing. Who wouldn’t want to turn hard and fire in the downswing?
Image 5:
The original downswing! With this move the golfer gets the club head too far to the inside coming into the golf ball and will struggle with blocks, hooks and poor quality strikes. Success with this downswing is very much timing reliant.
Image 6:
The objective for the downswing! With this move the golfer will deliver the club with a more neutral path, will hit down on the ball appropriately and be far less reliant on timing coming into impact. A happy golfer and coach.
So how did we get it done? With a short-ish backswing the club head needed to be in a better position at the top of the backswing as the player had very little time to calibrate and position the club head for a proper delivery. Our goal was to improve the position at the top of the backswing in order to make the downswing free-er so the golfer could rotate hard left through impact. A good recipe for crisp strikes coupled with improved accuracy.
The results here were as intended - a more neutral path and better attack angle for straighter and properly struck shots.
Please don’t ever judge a golf swing by one picture.
The first question you should be asking is why on earth would anyone want to shallow the club? The primary reason is to stimulate some body/pivot rotation through impact in order to better manage the face angle. This leads to improved predictability. Watch this…
Watch for shallowing in a false fashion where the CLUBFACE becomes compromised leading to a flip through impact.
Watch for shallowing by tipping the spine away from the target where the PIVOT rotation becomes compromised.
A great take home exercise is to get in front of a mirror with a club (be careful!) and 1. Feel the wrist twist on the way down in order to position the clubface for success and 2. Feel the lead shoulder staying lower for longer in transition.
Create the right look, and it’s okay if it’s exaggerated, in front of the mirror and take the necessary feels with you to the practice ground.
Don’t spend an inordinate amount of time with the Wall Scraper Drill, but give it a half dozen attempts or so just to help with organizing the appropriate sense and feel for what a proper shallowing motion really feels like.
All the best and feel free to reach out should you have any questions. Thanks for watching/reading and I sincerely hope this helps your ball striking!
TrackMandefines attack angle as the direction the club head is moving (up or down) at impact. How much the club head is traveling up or down is reported in degrees… 2º up or 6º down. You’re no doubt reading this in an effort to improve your golf and the purpose of this article and video is to share my experience pertaining to attack angle and how you can use this knowledge to upgrade the trajectory, shape and strike of your shots. Watch…
We need to be on the same page with a few important points in order for a better understanding to take place…
Club Delivery
a narrow downswing will typically encourage a steeper, more downward angle of attack
a wider downswing will typically promote a shallower, less downward angle of attack
Narrow Downswing
Wider Downswing
Club Path
an overly downward strike will move the club path more from in to out
an overly upward strike (driver typically) will move the club path more from out to in
Club Speed
a faster club speed allows for the golfer to hit down more and still maintain a functional flight
a slower club speed requires for the golfer to hit down less in order to maintain a functional flight
Keep in mind that hitting down does not make the ball go up! For more information on this point please watch this brief explanation.
Compression
please keep in mind that hitting down more does not equate to greater compression for ANY shot
please stop trying to decipher the meaning behind ANY divot
the only take away from divots is that if there is dirt flying everywhere when you practice, you MIGHT be hitting down too much - period!
There you have it. I hope that perhaps some of this insight will help you to better understand the details of YOUR golf swing and what you can work towards in order to improve the quality of your shots and your experience out on the golf course.
If you have a friend that might benefit from this article/video then please feel free to share it. Thanks for reading and for your support.
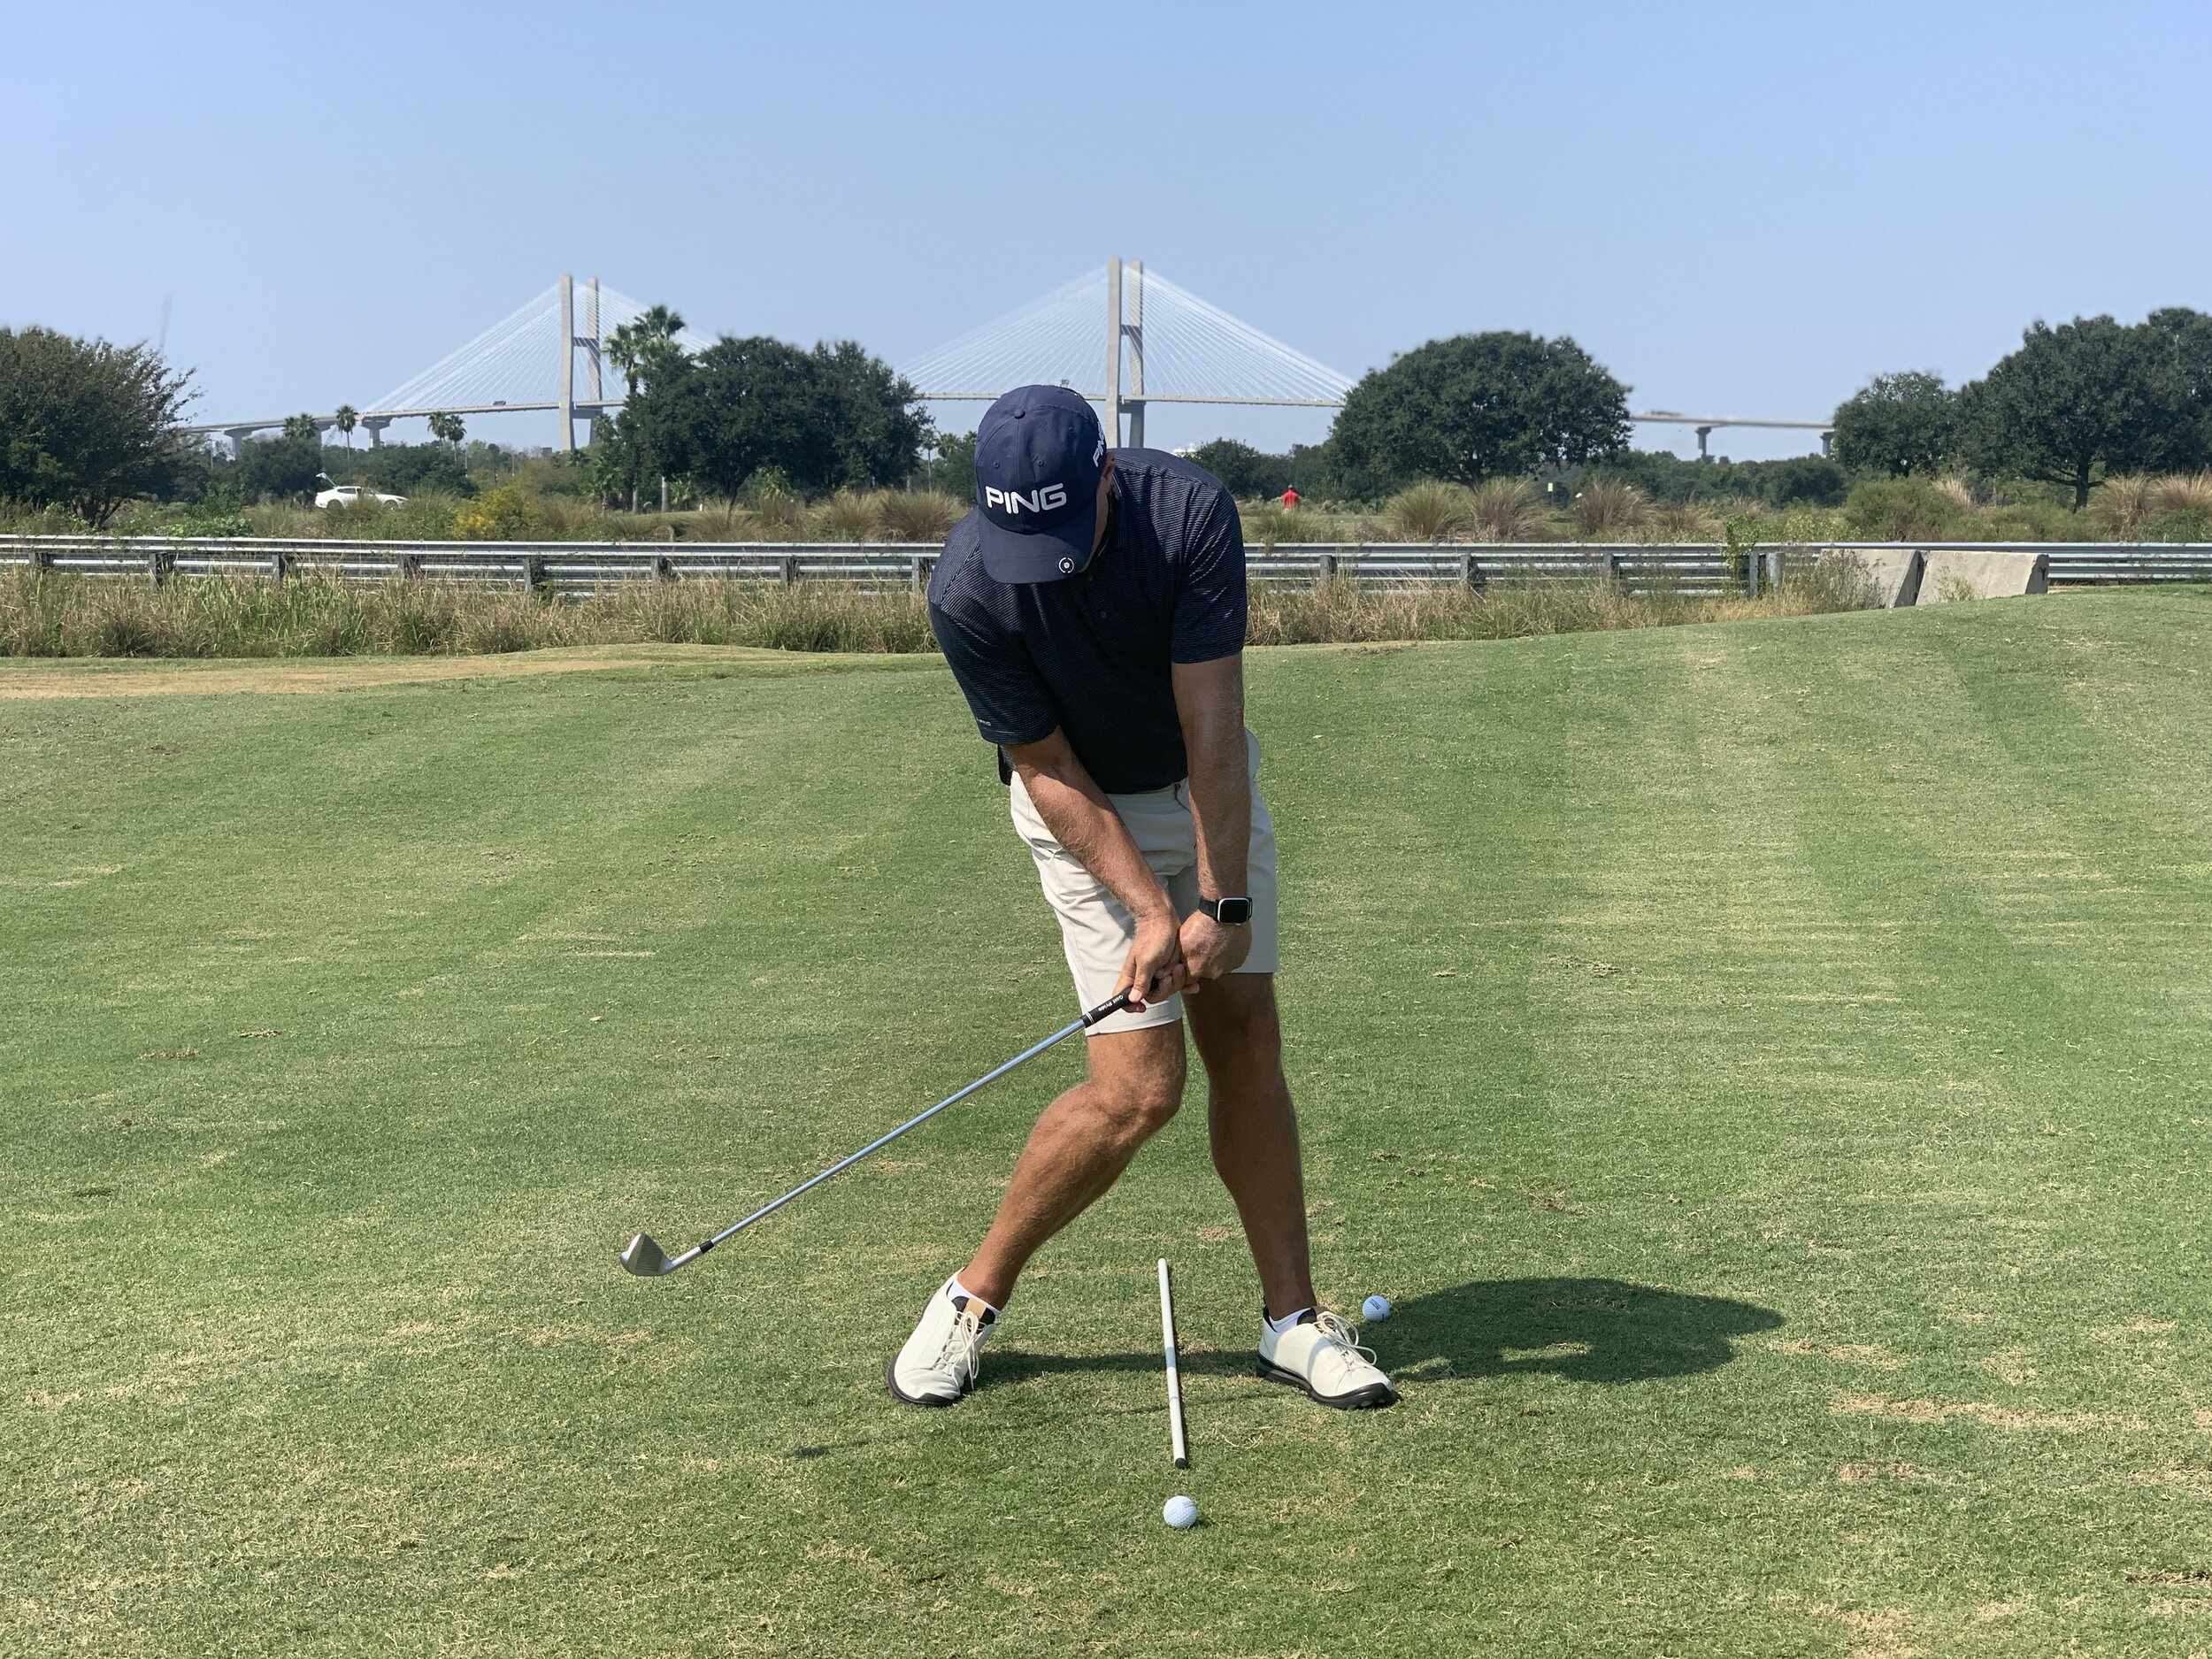
What does 'get open' at impact mean? Why is it important to be open with your hips and chest as you approach impact? Now for the million dollar question - how can I do it? Start by taking a few minutes to watch and listen as I address all of these questions here...
What is it?
PGA Tour players are on average around 45º open with their hips and around 25º open with their chest at impact
Some are more and some are less, but all are open to some degree
Why is it important?
Getting the body rotating through impact allows for the hands to play a more passive role, thus allowing for a quieter clubface through the strike
Most golfers hit shots off line due to an inability to control the clubface through impact
All golfers would like to be more predictable with their ball flight and a quieter clubface through the strike will typically lead to improved control
How can I get open?
Get the clubhead deeper/more behind you as you start the downswing
Use your wrist angles to maintain control over the clubface and get it in place for a passive ride through impact
Observe your lead arm position going up and most importantly, coming down, while avoiding anything extreme
The great golfers pictured above have an uncanny knack at controlling the clubface through impact. I'm convinced that getting the hips and the chest more than less open as the club strikes the ball will help you to become a more consistent golfer.
Predictability! A word I use every day on my lesson tee. We don't need perfection, although that would be nice, we simply need to predictably launch and shape the ball and we can play the golf of our dreams.
I have found that when a golfer can get the handle of the club traveling inward through the strike managing the club face becomes less of a challenge. Thankfully this doesn't mean that the clubhead is also traveling inward. Watch....
Obstacles to watch for when working towards getting the handle to travel in while the clubhead travels out:
The arms drop straight down and in from the top creating a scenario where they are trapped and can only 'exit' outward through impact
The handle AND the clubhead both move outward at the start of the downswing. Now they must both travel inward though impact
The hips drive forward too much and the handle has no access to work inward through impact
The following sequence of Graeme McDowell illustrates beautifully how to set up the transition and ensuing downswing for exactly what we are looking for through impact.
Graeme McDowell
To get started with predictable, controllable draws you simply must work the hands in while the clubhead travels out through the strike.
While this is certainly not the only way to get the job done, for slower swing speed golfers (which is most of us out there!) this is the go to game plan. Start in front of a mirror and go from there....
Thanks for reading and if you have a friend who might be struggling with this please share.
If you're interested in join me on a Golf Safari to South Africa this January with your loved one please contact terri (at) andrewricegolf.com or visit www.syncexcursions.com for more details.
As we all know most golfers tend to struggle with fading and slicing the ball, but there is a large portion of the golf population, typically lower handicap players, that struggle with hooks and the occasional block. This article is for you!
There's a huge correlation between between a golfer's club speed and their handicap. The higher the speed, typically, the lower the handicap. The key is being able to manage the golf club while generating higher club speeds and that can only happen with a proper pivot and more specifically, a proper downswing pivot. Here's how...
As you begin your downswing you want to feel the following:
The weight remaining on the trail foot for longer
Cast your net! More rotational and less lateral
The legs separating slightly
The handle of the club working out or in front of you while the clubhead stays behind you
The objective here is to get the clubhead traveling less outward and along a more neutral path through impact. Getting your body to rotate on the way down in more of a 'merry-go-round' fashion and less of a 'ferris wheel' fashion will deter the clubhead from getting too far to the inside.
Try this feel slowly and with soft shots before working up to full swings. You'll be amazed at how challenging it is to actually stay back and rotate versus driving forward. Stick with it and realize that in order to improve the quality of your shots you're going to have to improve how the clubhead communicates with your golf ball.
Thanks for reading and if you have a friend who you feel might benefit from this information please share!
A common complaint I hear from golfers is that their swings are too fast or aggressive. They just have a sense that they are quick either in the transition or the downswing.
Rhythm and pace are very important elements in the golf swing. When a golfer feels quick the first thing they do is try to 'slow down'...and in an attempt to get some rhythm in the swing they often go overboard and end up slowing everything down a little too much. This can lead to an overly slow start to the swing, which in turn leads to a rapid change in pace during the transition and on into impact. It is this drastic change in speed that conveys the sense of quickness and aggression in the swing.
The PGATour average time for the backswing is right around 0.75 seconds, with an additional 0.25 seconds for the downswing. Notice that ideally there should be something close to a 3:1 ratio of backswing time vs. downswing time. That means that on average a Tour golfer will strike the ball in about a second from when the swing starts. Ernie Els, one of the smoothest swings out there, takes just over a second to strike the ball while Nick Price, who has one of the faster swings, takes around 0.8 seconds. Far too many of golfers I teach take well over a second to complete just the backswing. In watching Els or even Price, most golfers believe they swing a whole lot faster than either of those two top players - that is not the case.
Each of the above golfers are able to maintain a good rhythm in their swing because they maintain something close to a 3:1 ratio in their swings. When a backswing takes over a second to complete the golfer is now faced with a 4:1 or even 5:1 ratio which feels way out of rhythm.
Here are a few pointers when trying to get better rhythm and pace back into your swing:
Don't try to speed up your backswing up too quickly - take one pill a day and not the whole bottle...
The body should not feel hurried; the wrists and arms will create much of the necessary increase in speed.
Try a few shots with the clubhead starting 2-3 feet ahead of the ball and then flow into the backswing in one motion. This gives the club a moving start and gradually increases the pace.
Remember that rhythm does not have to be slow...
Stay patient and gradually build up to it; try to build the speed in your downswing from the transition.
There are not many ways to track your timing ratio, but SwingCatalyst software does it for you.
Another factor to consider is that the less time your swing takes the less opportunity you have to get your body out of position. This is a very important factor and cannot be overlooked - keep the motion concise and it is more likely to be consistent. Give it a try....
Long ago I came to realize that much of modern day golf instruction is based primarily around instructor style preference. Way too much of the information being peddled is form based instead of being function based. Tommy 'Two Gloves' Gainey's win this weekend on the PGATour illustrates that there is more to a golf swing than simply what meets the eye.
In studying the top golfers of all time - no two swings are alike. Who is to say that Ben Hogan's flat plane is better than Jack Nicklaus' vertical arm move? Who is to say that Sam Snead's slight over the top move was better than Nick Price's drop down transition?
Ultimately it all comes down impact and physics - the forces and angles you are causing the club to impart on the golf ball. Impact is the one position in which all of the great players are decidedly similar. From Patty Berg to Annika and Tom Watson to Phil Mickelson - all these players assume a very similar position at impact. If this is the case, which, trust me, it is, then the appearance of the swing should play far less of a role in a golfer's path to improvement.
Here are the elements of a great impact position with irons:
the weight is noticeably on the front foot; 80% or more
the handle always leads the clubhead
the head remains over the ball, while the hips have shifted to the target; this creates what I refer to as body 'curve'
the clubhead travels down (downswing) into the ball; this includes fairway woods and hybrids
Here are two short videos to help:
The next time you take a lesson make sure your teacher works towards getting you into a better position at impact. It is the only way you are going to start hitting better, more compressed golf shots.
Andrew Rice Golf
Andrew Rice Golf. Providing golf instruction for all levels of golfers. Here you will find advice on golf instruction, golf course management and golf tips. Andrew Rice Golf is located at the Westin Savannah Harbor Resort and Golf Club. Three-Day Golf School information may also be found here.
RT @golf_fanatics_: 🏌️♂️2 ⛳️ = Tee to Green
T-minus 3 days until launch date🚀
If you’re ready to take your game to another level. Th… https://t.co/rXhltRYgw5