Straight Shooting Concepts

We can all do perform better when we have good information. A clear understanding and vision of how things really work. In this video I will try to share important keys to help you start to hit the ball with more accuracy via a few simple concepts. Watch…

A few notes to consider:

  • We hit straight shots by swinging in circles/arcs

  • The clubhead does not need to travel ‘down the line’ after impact

  • There is no need for every golfer (RH) to work towards swinging to right field. Chronic slicers might need to do this for a while, but not forever!

  • Divots will typically show us far less than we have been led to believe

  • Once you know how to hit a hook, it’s time to neutralize

  • Improved mechanics will almost always reduce the golfer’s reliance on timing and athleticism

IMG_4687.jpg

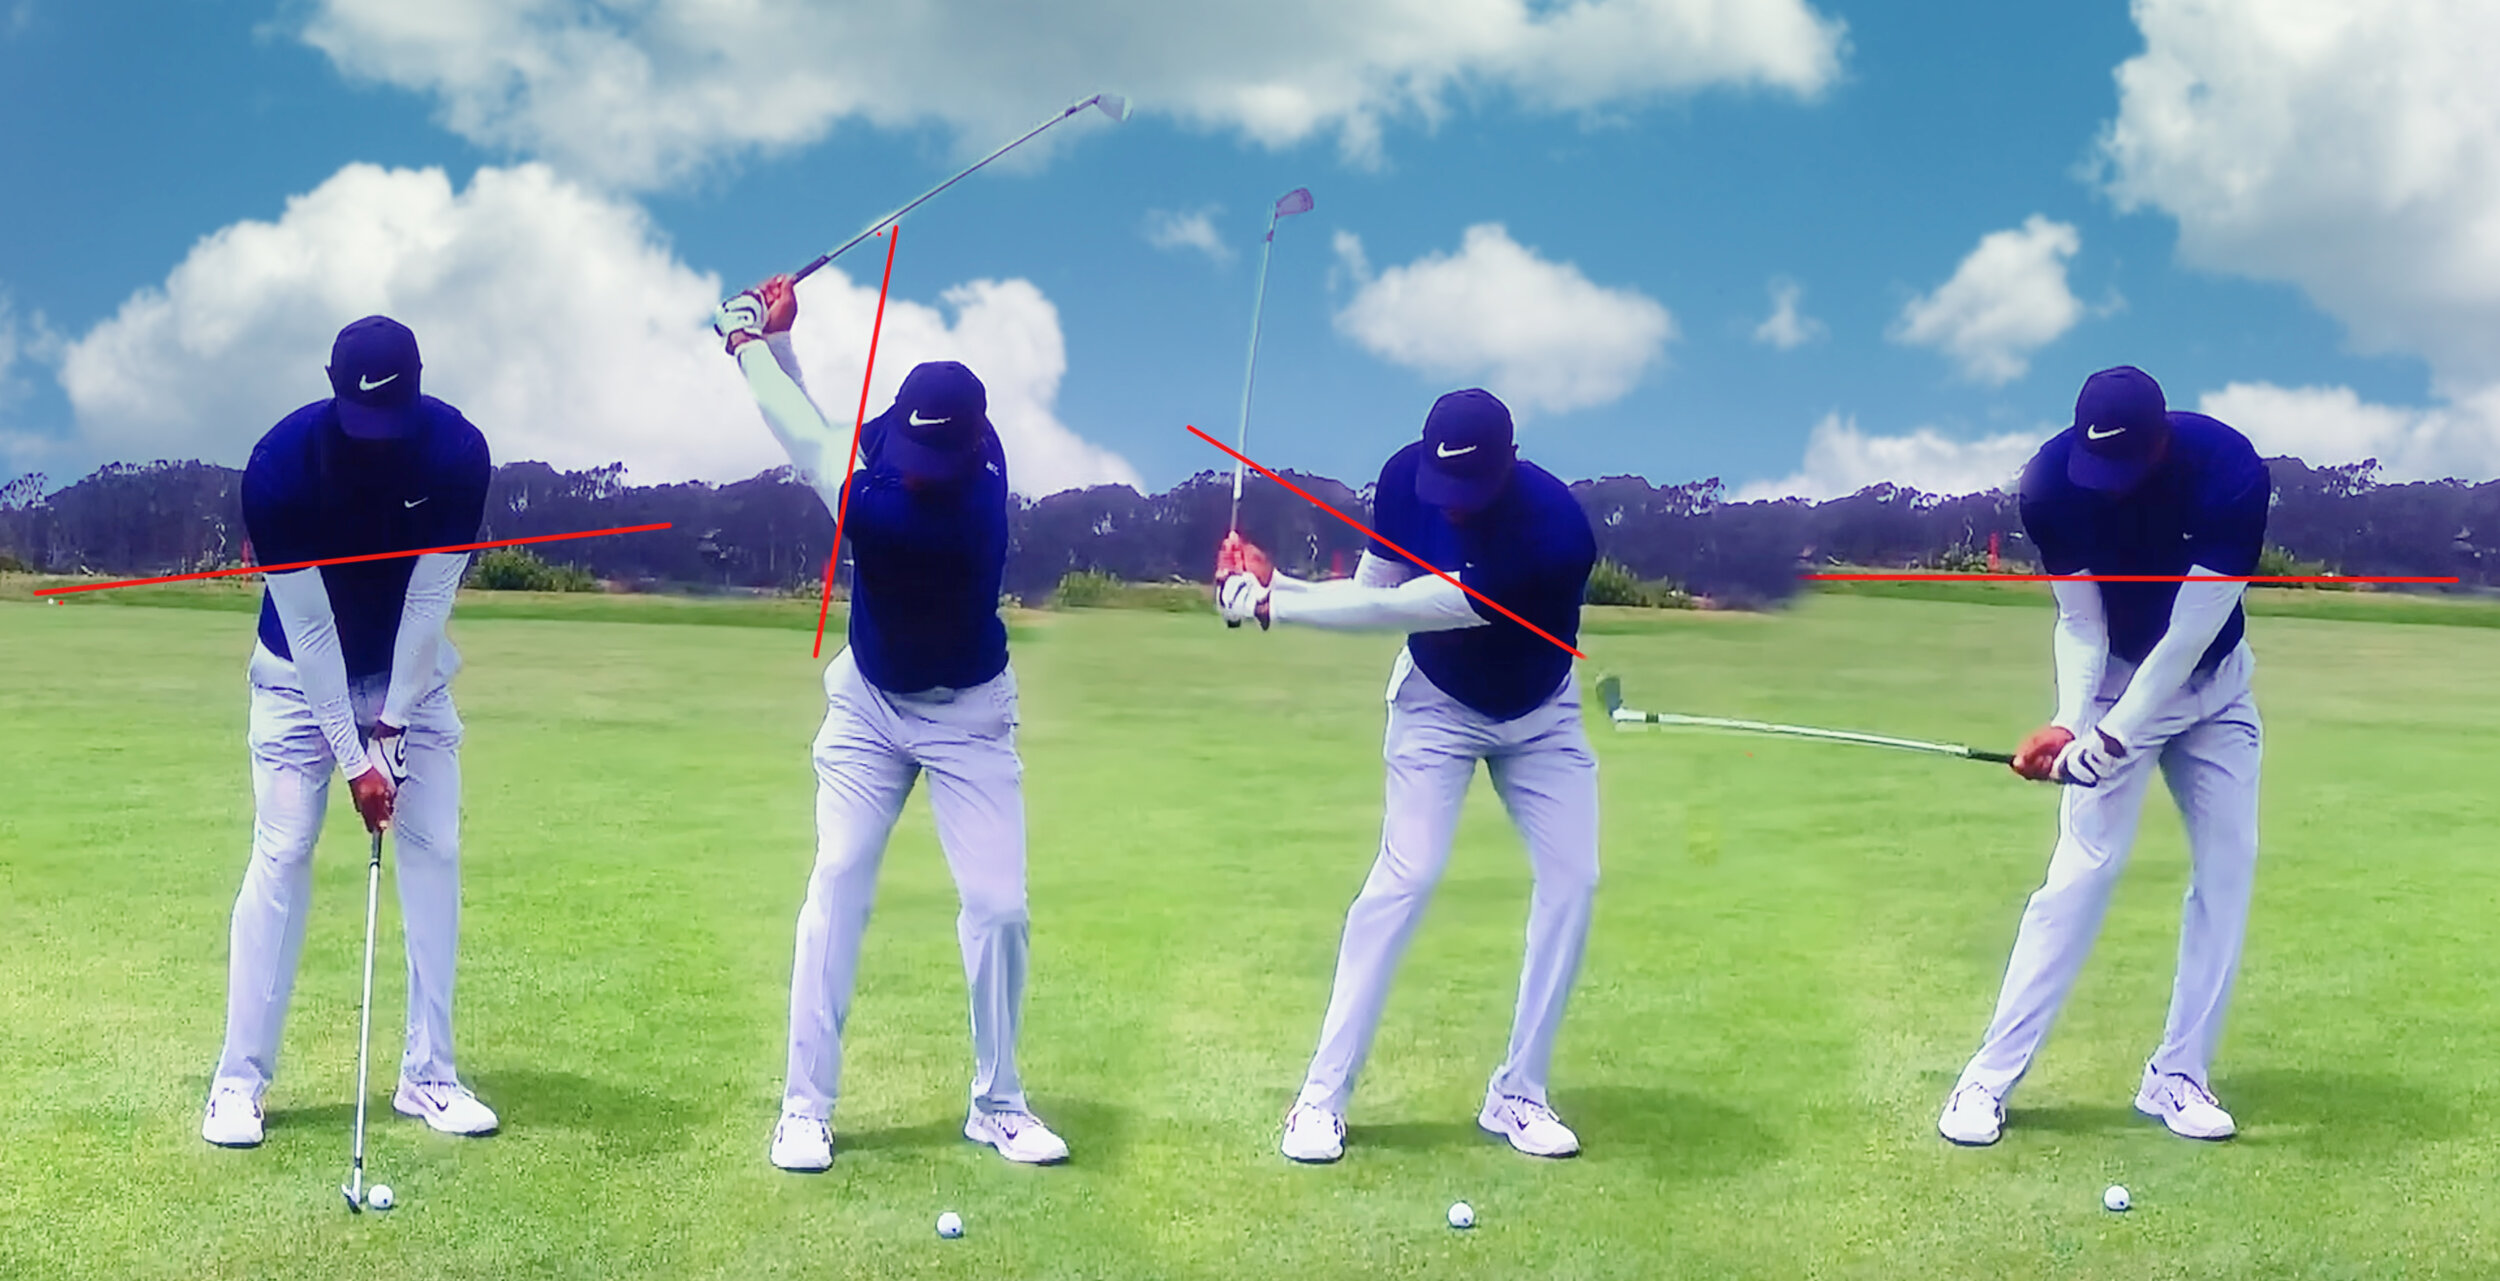
In the above image, due to the slower than necessary shutter speed, you can clearly see how Sergio’s clubhead has started to track back inside the flight of the golf ball. That’s a common trait for all of the best ball strikers in the game!

Thanks for watching/reading and I hope this information gets you thinking and, ultimately, playing some better golf.

If you’d like to attend one of my Three Day Golf Schools to get some personalized, hands-on attention please check out this LINK snd shout with any questions you might have.

A Strict No Tipping Policy!

We’ve all been there - a constant battle between fats and thins, blocks and sweeping hooks! This malady is something I experience all too often on my lesson tee and I have an idea that I know will help many of you. Once you work your way through this article your approach to ball striking, your concept of how it should work, will never be the same again. Take a look…

I have come to believe that the primary culprit in tipping the upper body back is the quest to work the clubhead back to the inside or shallow the club on the downswing. I’ve written that “It’s All About Impact”, but you can only arrive at an appropriate impact when certain elements are in place going back and on the way down. The better the clubhead is positioned in the early downswing the less likely golfers are to tip their shoulders and spine away from the target too early.

Here’s a face on shot of Tiger Woods from the PGA Championship in San Francisco. I like this example as the bottom of his sleeves seem to correlate to shoulder tilt in these frames.

Tiger Woods

Tiger Woods

Frame 1: Far too many golfers have significantly more shoulder tilt than this at address. The lead shoulder should always be higher, but only marginally.

Frame 2: It’s amazing that Tiger can turn this well after his back issues. That being said, notice how much higher the trail shoulder is than the lead. He has turned well, but perhaps more importantly, he has pivoted on a fairly steep incline with the shoulders.

Frame 3: The inclined pivot going back has aided his ability to initiate the downswing without a hint of tipping away from the target. The weight is left and the body is rotating appropriately.

Frame 4: A great checkpoint for all golfers - make sure that just before the shaft gets back to parallel to the ground, your shoulders (or sleeves) are pretty close to parallel to the ground as well. From here the low point of the arc is well forward of the ball and the player can rotate freely through impact, aiding with club face control. Better ball striking and accuracy!

Get out to the practice tee and make a few exaggerated practice swings as I demonstrated in the video above. It will, and should, feel strange, but straight away you’ll notice how the low point to the swing is now after impact and you can rotate more freely through the strike. Give it a go and let me know your findings.

Thanks for reading!

A Lesson to Learn From...

I recently gave an old friend a lesson. Having not taught him for a few years I had an inkling as to what to expect, but things came together so well I thought the information might be beneficial to more than just one student.

This is why looking at still frames of an athletic motion can be deceiving. There are six different images/videos here that we will go through in a specific order. To get the most out of this post please make sure you go through this it slowly. Be sure you comprehend each image before moving to the next…

614EC106-E63C-4C19-B0D3-B858E784B158.JPG

(The original/before is always on the right in all of the images/videos)

Image 1:

Notice how these two images appear to be somewhat similar. I think many of us would give them both a thumbs up! They might be somewhat similar, but the outcomes are very different due to the unseen forces being applied to the club. Do not be deceived!

DB255940-B2A6-477C-B9A5-F8545133331B.JPG

Image 2:

The player at the top of the backswing. The yellow line indicates where the sweet spot is relative to the feet and the golf ball. Notice that in the ‘after’ version the club head is significantly further to the inside than the original. This is shown by the distance between the line and the golf ball.

6F07DEF0-8421-449C-A111-4320A3C4E2B8.JPG

Image 3:

At approximately lead arm parallel to the ground notice how the golfer has had to force the club head to lay down on the before side. This is indicated by the difference in gap between the yellow and blue lines. Not much difference here, but the force the player is exerting on the club is very different here.

F07F5352-2ECE-48A5-BDD0-EE6285807F13.JPG

Image 4:

This is where the difference starts to show. On the right side you’ll notice that the excessive, yet necessary, lay down force has bled over and now has the club head in a position where the path will be too far out to the right, strike quality will be compromised and the player is dealing with blocks and hooks. Notice how the gap between blue and red line on the left is greater on the left side. That’s due to the fact that the golfer is free to rotate instead of having to force the club head to the inside in the downswing. Who wouldn’t want to turn hard and fire in the downswing?

Image 5:

The original downswing! With this move the golfer gets the club head too far to the inside coming into the golf ball and will struggle with blocks, hooks and poor quality strikes. Success with this downswing is very much timing reliant.

Image 6:

The objective for the downswing! With this move the golfer will deliver the club with a more neutral path, will hit down on the ball appropriately and be far less reliant on timing coming into impact. A happy golfer and coach.

So how did we get it done? With a short-ish backswing the club head needed to be in a better position at the top of the backswing as the player had very little time to calibrate and position the club head for a proper delivery. Our goal was to improve the position at the top of the backswing in order to make the downswing free-er so the golfer could rotate hard left through impact. A good recipe for crisp strikes coupled with improved accuracy.

The results here were as intended - a more neutral path and better attack angle for straighter and properly struck shots.

Please don’t ever judge a golf swing by one picture.

Downswing Matters...

Most of you have been following me for long enough to know that I believe the location and orientation of the clubhead in the early downswing are vital to an effective golf swing. The appropriate position and orientation of the clubhead will enable you to rotate freely through impact, controlling the face and compressing the golf ball. The following short video will help you understand the value of clubhead position in the early downswing and why it’s so important in building a sound impact position

Where you position the clubhead in the early downswing is integral to your ability to rotate and manage the club face through the impact interval. Better rotation means less flipping and more accurate shots. This matters - big time.

In the following short video you will learn why, even though you may have been doing a better job with positioning the clubhead (shallowing the shaft), your game has not improved. Improper shallowing can compromise the club face angle in the early downswing and actually promote active hands or flipping through impact. Here’s the remedy…

There you have it. Getting the clubhead deeper (more BEHIND you) in the early downswing without compromising the face will produce incredible results for almost every golfer I teach. I suspect it will help your game too. A good place to start is in front of a mirror - create the proper look, don’t worry about exaggerating things, take the appropriate feel from that look and go out and practice. Keep reinforcing in front of the mirror.

A Young Jack Nicklaus

A Young Jack Nicklaus


Tales from the Trail Side

I’ve found that is can be tremendously helpful for any golfer to fully understand the ins and outs of impact. Today I want to address the trail side and what my preferences are for it as we approach impact. Let’s start with this…

What are we looking for at impact?

  • Hips and chest rotated open relative to the target line

  • The trail hip should be lower than the front side counterpart

  • As a result the trail leg is flexed and the knee has moved towards the ball

  • The trail arm is flexed

  • As a result the trail shoulder is lower than it started at address

  • The spine has tilted away from the target (side bend)

While generating speed can be genetic to a certain degree, our ability to control the club face at impact and thus the direction and shape of our shots is largely a product of both technique and skill. Merely posing impact, as I have demonstrated in the video above, might shed some light on what you need to work on in order to better control the strike and accuracy of your shots.

Brandon Stone

Brandon Stone

You might be shocked at your results when you can start to master the trail side through the impact zone. Now let’s get to work.

This Guy is Really Long...

Last week I had my first opportunity to work with a professional long driver.  Having never taught one before I was not sure what to expect, but I knew that with TrackMan I could help him become more efficient and ultimately make him better at his profession. I must admit though -  I was nervous about how to go about things prior to our meeting.

The fine young gentleman I taught was Patrick Hopper - already an accomplished and successful long driver that finished in the top 10 in Remax World Long Drive Championship in 2010.

He arrived with a golf bag full of 48" drivers (all USGA spec) and after chatting for a while he shared that his tendencies were high fades and he sometimes struggled to find the grid. When he started hitting I was in shock - these were the highest and longest golf shots I had ever seen. We even had to get him to aim a little to the right so as to not rain down drives on the golfers warming up on the far side of the range over 350 yards away.  The photo below shows how much the ball actually compresses into the face before departing in a hurry....

After watching him hit about a dozen drives we took a look at his TrackMan numbers for a few of his better shots:

  • His average apex height was just over 200 feet which was massively high
  • His spin rate at 2800 rpm was high
  • While his club path was 5.5 degrees outward he tended to hit too many weaker fades which indicated a heel strike

We set out to lower the trajectory and encourage baby draws with a strike point that was very slightly favoring the toe side of the club. After some work and "chipping" a few drives at around 120-125 mph he started to get the hang of a straighter club path and an improved strike point.

Here is a comparison of his best shot before and his best shot after.....

The shot above indicates a slight toe-sided strike which was not his tendency in the early going. The shot below also indicates a similar strike point, but now with a more appropriate launch angle, better spin rate and 15 extra yards.

Keep in mind that the above shots were hit with newer Titleist NXT Tour golf balls into about a 10-12 mph headwind!

What an amazing talent this young man is - I was amazed at how calm and sincerely pleasant he was to work with. At the end of the day he received the same lesson I give golfers everyday - improved distance via better efficiency and improved accuracy via an understanding of how your swing should cause the ball to respond. Keep an eye on Patrick Hopper.

That really was fun!