Hitting Up on the Driver
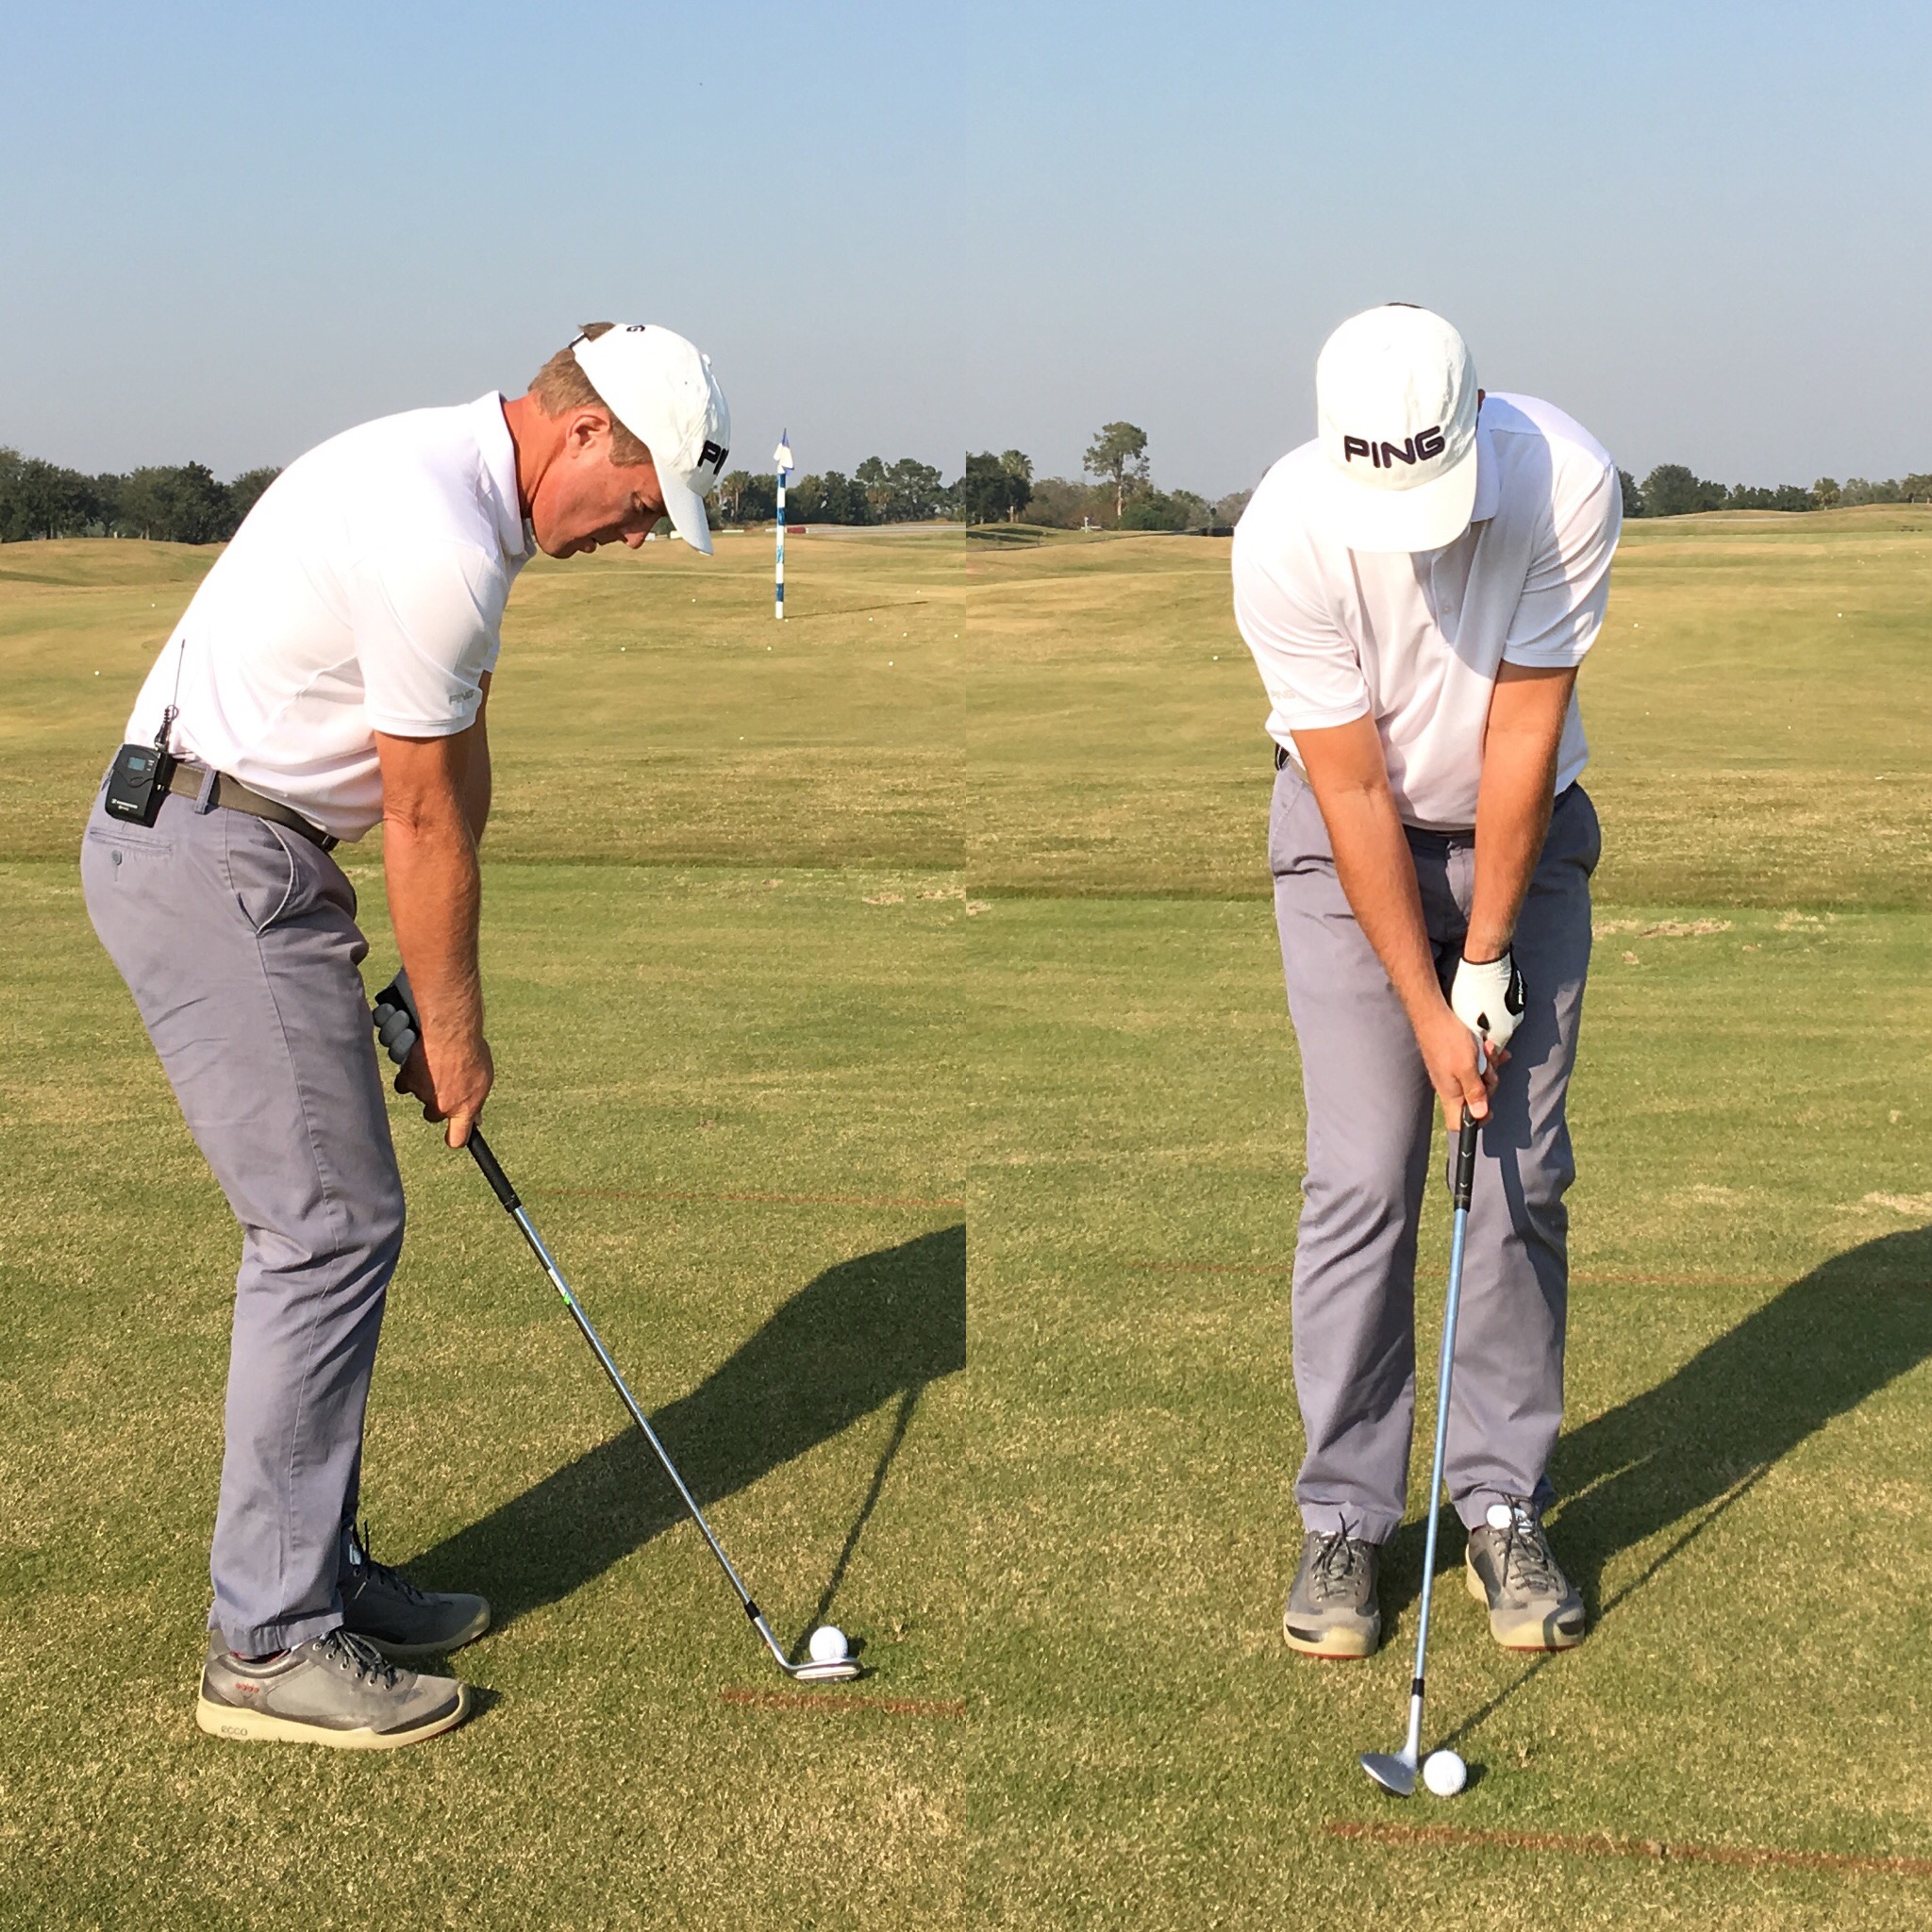
I often conduct this demonstration for my Three Day Golf students where I hit back to back shots and attempt to illustrate the value of hitting up on the driver and what it could mean to their tee shots. For good measure I also throw in a little fade versus draw at the same time. 

My intent is to maintain a similar club speed from one swing to the next and if possible strike the ball in a similar location on the club face. As you'll see this was an occasion where I managed to get pretty close...

IMG_2039.JPG

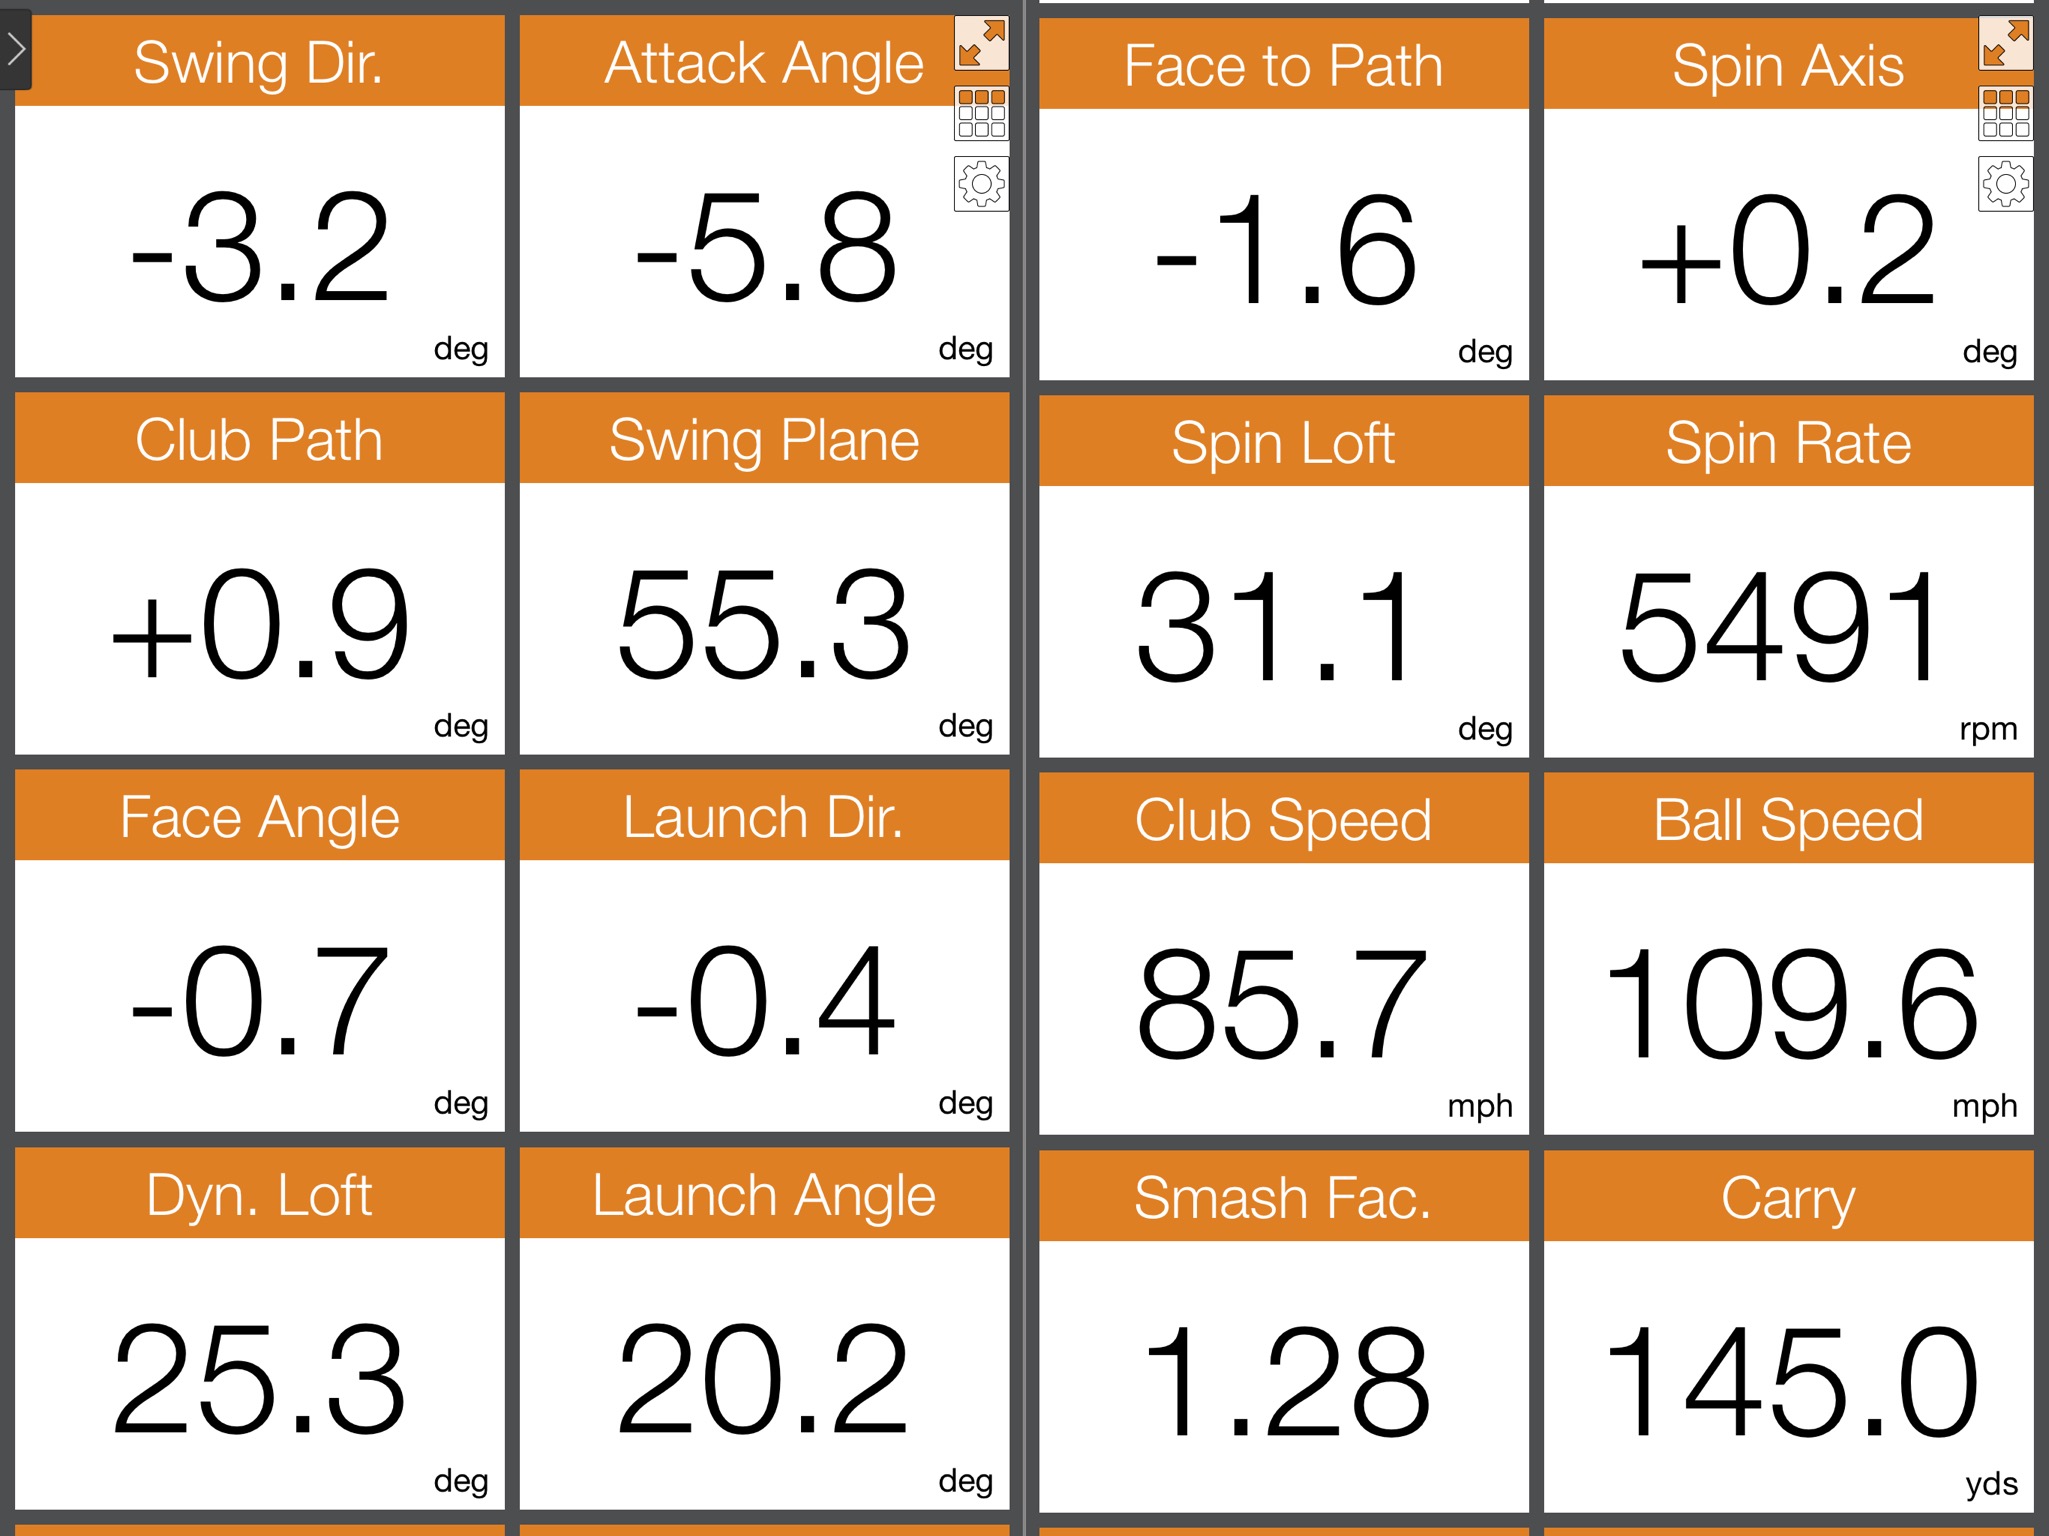
This TrackMan screenshot illustrates the first shot where the idea was to hit down and across the target line, imparting a low launching and fading ball flight...

The First Shot

The First Shot

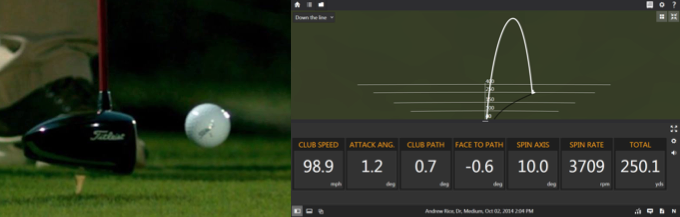
This TrackMan screenshot illustrates the follow-up shot where the plan was to deliver the club head to the ball with it traveling up and outward, imparting a higher launch and gentle draw to the ball flight...

The Second Shot

The Second Shot

Let's take a deeper look to see what some of the important differences are between these two interesting shots:

  1. Attack Angle - The 9.1º difference is the primary reason why the second shot traveled significantly further than the initial attempt. This was achieved with a change in tee height, address position and intent.
  2. Club Path - The almost 14º difference here will generally lead to a huge change in ball flight curvature. My findings have shown that when it comes to shot shape the club path plays a primary role.
  3. Launch Angle - The old adage of 'hit down to make the ball go up' takes a beating here as the shot hit with an ascending strike launches significantly higher.
  4. Club Speed - Nothing much to see here other than to verify that the club head for each shot is traveling at virtually identical speeds.
  5. Ball Speed - Another interesting nugget here is that while the carry and total distances are significantly different there is very little difference in the ball speed from shot to shot.
  6. Carry - Wow! That's amazing isn't it? While impact location for the second shot was slightly higher on the face (and a hint more toward the toe) which might lend to slightly longer carry distance the direction the club head was traveling (up and out) is the primary difference maker here.
  7. Total - As you might imagine the increase in total distance follows suit along with the increase in carry distance.

I know we could all benefit from a gain in almost 30 yards off the tee. And keep in mind that's at the same speed and with the same club! No need to hit the gym or shop for a new driver. This video gives some insight into what's required to affect the changes you've seen in this demonstration...

Thanks for reading/watching. If you need hands-on help with your game I'd love to host you in Savannah at the Westin Savannah Harbor Resort for either a lesson or a Three Day Golf School. Email terri(at)andrewricegolf.com for details.

You Need More Power

Yes! Don't we all? As with all things in life some things are easier said than done and this is no different, but it IS possible. Have you heard about using the ground to generate more power? This is what I'll be addressing in this article - pushing off the ground in order to generate greater club speeds and longer shots. Take a look...

So here's what we're looking for just prior to starting the downswing:

  • The trail knee maintains its position as the golfer starts the downswing. Just for a little while...
  • The lead side separates as the player glides into their front side. This creates some leg separation.
  • There should be a definite lowering or unweighting in the early downswing.
  • The late downswing should be characterized by an upward thrust away from the ground.

Notice in the image below how in the early downswing my belt buckle is significantly lower than it is half way through the follow through...

Image 11.JPG

This is something that all long drivers take full advantage of - that ability to really thrust up from the ground and in most cases actually push both feet off the ground. It's that push that will help to really get the clubhead moving. 

Thanks for reading/watching and if you have a friend who would really benefit from this information please share it.

Trajectory Tricks

The loft on the clubface at impact is largely responsible for the launch of the ball. When it comes to wedge play friction also plays a significant role in determining the launch angle, but the purpose of this article is to share an idea to help you improve the loft you deliver to the ball at impact.

Most of us will either hit the ball overly high or too low. This video illustrates a simple drill to get you to feel what you need to feel in order to grasp what is required to deliver either more, or less, loft.

For the high ball hitters:

  • Using a pitching wedge get set up with a narrow stance
  • Position the ball off the tip of your front foot
  • Feel the handle or butt of the club travel a long way forward into impact
  • It’s not easy but do all you can to hit low launchers

For the low ball hitters like me:

  • Stick with the PW and a narrow stance
  • The ball should be in line with the tip of your back foot
  • In the downswing you’ll feel the clubhead swinging a ton. The clubhead should feel like it outraces the hands
  • This will feel scoopy and that’s a good thing

Notice where my hands are just post impact in the image below - the low ball hitters need the hands less forward while the high ball hitters need to sense how much more forward they need to be…

It’s never easy making changes as they always feel so uncomfortable. Let’s get away from associating discomfort with ‘wrong’ as you work towards improvement. I know this exercise seems like it’s the opposite of what it should be, but as the task becomes more challenging (which this one is) we have no choice but to adapt.

The good news is that this drill applies directly to your long game too, so don’t be afraid to incorporate a few of these drills with those full swings too.

Thanks for checking in and I hope this helps you to enjoy your golf a little more.

Develop Your Skills

Getting better at golf should be fun! As I become a more experienced coach I'm finally grasping the role that skill plays in lowering any golfer's score. I think of skill as what you can do with your technique. What shots can you hit? How well can you control your golf ball? That's achieved with skill. Check out this drill that I came up with to not only help you become a better golfer, but also to help you have more fun while you practice...

We all need skills. Hopefully wicked skills! By giving yourself ONE opportunity to hit each of the shots required to complete this drill you are continuously challenging your ability to adapt to the requirements of each unique situation. Something real golf requires on every shot! The seven required shots are a big slice, a medium fade, a baby fade, a straight one, a baby draw, a medium draw and a big hook. Don't hit them in order, but mix it up. Real golf doesn't work in a neat and smooth progression - neither should your practice. Keep a score too. It will help you strive to achieve full marks! 

Add golf skills to your resume...

Add golf skills to your resume...

Give this drill a try the next time you go out to practice. In fact, any skill based challenge or drill you can come up with will help you to develop wicked golf skills that you can take out on the course with you to start shooting lower scores.

Thanks for reading.

3 Key Drills for Great Wedge Play

Far too many golfers struggle with their wedge play. I see it all the time! In this article and video I have dug deep and come up with my three favorite drills for you to practice if you'd like to get better from close range. Take a look...

Impact Drag Drill

  • Using an alignment rod in lieu of a club take your normal pitching address position
  • Place the tip of the rod on the ground about 3 feet behind where the ball would be
  • Keeping the arms extended, rotate and elevate the lead shoulder to get the rod through impact

Pitching Draw Drill

  • Tee the ball up and place an alignment rod between the ball and the target
  • The objective is to get the ball to draw around the rod
  • Have the handle traveling up and in while the clubhead travel down and out for draws

9 Ball Trajectory Drill

  • Using nine balls to develop skill and adaptability
  • Hit the first three balls to three different targets with your stock trajectory
  • The second three balls are hit with a slightly higher trajectory to different targets
  • The final three are hit with a lower trajectory to different targets as well

My hope is that these drills will help to upgrade your technique, develop your skill around the greens and ultimately help you become a more well-rounded golfer.

Thanks for reading/watching and if you enjoyed this article please share it with a friend who you feel might benefit.

My 3 Keys to Great Wedge Play

If you dread any form of pitch or chip shot then this article is expressly for you. If you feel like you could save a few more strokes around the greens then this article is for you. Utilizing better technique will literally make these shots easier. Here are a few straightforward improvements that will get the job done. Watch...

Key #1: Set Up

  • Feet should be close together. The most common mistake I see is a stance that's too wide.
  • Alignment should be square. Yes, square.
  • Ball position is centered to slightly forward.
  • Weight distribution is slightly favoring the front foot.
The Proper Set Up...

The Proper Set Up...

Key #2: Wrist Action

  • Wrists should be relatively quiet in the backswing.
  • Avoid excessive cupping in the lead wrist. The left wrist for you righties out there.

Key #3: Body Pivot

  • Keep the chest rotating through the strike in order to shallow the attack angle.
  • Extend the lead side through impact.
  • Avoid thoughts of "stay down", "hit down" or "pinch the ball".

As you work towards better technique be aware that your results are not going to transition from bad to good instantaneously. Taking ownership of the upgrades will take time and patience. Get the set up correct, use the wrists properly and shallow the angle of attack with good chest rotation. Now we're talking!

If you'd like to learn more about improving your wedge play check out the Wedge Project.


How to Stop Hooking

There are literally thousands of articles pertaining to getting rid of slicing or fading the golf ball, yet not much sound information to help golfers overcome hooking (and blocking)!

The video clearly illustrates what the primary causes are...

The dispersion drill will not only get you to improve the club path, but also encourage you to get the clubface pointing to the right of the target. Exactly the opposite of what you have been struggling with! With the feel from the dispersion drill you will no longer have the:

  • club path traveling too far from in to out
  • clubface closed to the path
  • have to rely on perfect timing to quality golf shots

Give this simple drill a try if you tend to struggle with blocks and hooks. If you enjoyed this video and article please share it with a friend who you feel might benefit from it.

Thanks for tuning in!


How to Practice: 3. SHOT

In this series on practice I have mapped out a plan to help each golfer take ownership of their technical upgrades (SWING), dedicate a portion of the valuable practice time developing skills by hitting unusual and ‘outside the lines’ type shots (SKILL) and now the time has come to bridge the gap between the practice ground and the course by turning our attention purely towards results (SHOT).

With this mode of practice there should be a constant changing of clubs, targets, lies and intent. Here the golfer should incorporate their pre-shot routine as they hit specific and on-course styled shots.

I’m a big fan of hitting irons to a specific side of a flag or target. Create scenarios in your head as you execute each unique shot.  There’s a deep pot bunker just in front and slightly right of this pin. I’ve got to keep this eight iron about twenty feet left… Drivers should be played down imaginary fairways from Augusta, Pebble Beach and Royal Troon, with trouble invariably looming on one side or both. Get into each shot just like you would on the golf course. Be sure to:

·      Change clubs after no more than two shots

·      Switch targets for every shot

·      Use your pre-shot routine just as you would on the course

·      Be specific with your intent for each shot

Don’t attempt crazy or unusual shots; we’ve already done that in our skill session. It’s time to step back inside the lines and play your go-to ball flight. For an added challenge you could even keep yourself accountable and see how many consecutive shots you can hit to the appropriate side of a target. Everything about this practice mode should simulate real, on-course golf. Play golf!

One final swing and the Open Championship is yours…

Be sure to read my two previous segments on practice:

How to Practice: 1. Swing

How to Practice: 2. Skill


How to Practice: 2. SKILL

Boys are typically much better chippers than girls! And it's not because they're more creative or the fact that they're stronger physically which allows them to hit a broader variety of shots. It's because they love to practice 'dumb' and crazy shots! Boys continually strive to outdo one another and I believe it's via this innate behavior that they learn to hit those amazing and skillful shots around the green. Ever seen a female trick shot artist? Hmmm...

My approach to developing skill is that we take this 'outside the lines' approach to practicing the shortgame and apply it to every element of golf. From driving to putting we can develop our skill and our ability to control the golf ball by spending time purposefully hitting 'abnormal' golf shots. Watch...

When practicing to develop your skill challenge yourself to become better at intentionally controlling the following elements of a golf shots:

  • Distance
  • Launch direction
  • Peak height
  • Curvature of the ball flight
  • Where you strike the ball on the face

When practicing 'outside the lines' change your intent after every second shot. Use a variety of clubs, targets and lies. Keep in mind it's really easy and fun to practice these elements when you have a TrackMan, but they are entirely doable without any technology. Here are a few ideas:

The 3 Ball Strike Point Challenge

The 3 Ball Strike Point Challenge

This drill is great fun for golfers of all abilities and ages. All you need is a can of Dr. Scholl's Odor X foot spray. I firmly believe we become better at completing any task when we learn to complete it a variety of different ways. Shot 1 is outside the vertical line, shot 2 inside it and shot 3 is on the line.

The Spin Axis Challenge

The Spin Axis Challenge

When taking on this challenge you want to use a 6 iron and try to hit the biggest hook or slice possible for your opening shot. From there the objective is to progressively reduce the amount of curvature until you get to a straight shot. If you can get 9 shots, as in the example above, you're doing very well.

When practicing to develop skill I cannot encourage you enough be creative, have fun and think outside the box. You can even hit one-handed or one-legged shots! Close your eyes, change your grip, hit it out of divots - anything goes. Come up with your very own, out of the ordinary practice session. Now get out there and start spending some time practicing like a teenage boy...

Here is the first article in my series on how to practice:

How to Practice: 1. SWING — Andrew Rice Golf

No More Weak Iron Shots

We've all heard the sound. And we've all felt it too. That sense when you literally melt a ball off the clubface and you know instantaneously that you've hit the shot you've been waiting for all day. That feeling is compression! To learn more watch this....

Here is an example lesson where I felt it appropriate to use this drill with a student who was struggling with the quality of his strike and high, weak ball flight in particular. Here is his initial TrackMan data for a typical 7 iron shot...

It's important to be aware that the height of this particular shot was 103 feet! This player's club speed is only a few mph short of PGATour average, yet he is only carrying a 7 iron 145 yards. After working on his compression (spin loft) via the drill illustrated in the video this is what a typical shot looked like in drill mode (note the slower club speed)...

The exact same ball speed with more than 7 mph less club speed! The spin loft, which is not an easy change to make, has gone from 31.1º to a slightly low 24.8º and the height has come down to a more manageable 76 feet. I anticipate that as this golfer works to get comfortable with their new feel they would increase their compression to a more appropriate 26º or 27º.

Before on the left and while doing the Compression Drill on the right

Before on the left and while doing the Compression Drill on the right

Thanks for reading and for greater understanding on what compression really is please read:

 Compress the Golf Ball — Andrew Rice Golf

Spinning the Wedges - Smash Factor

Smash factor is a measurement of the ball speed relative to the club speed. I have learned that with wedges, when smash factor is 1.0 spin rates have the potential to be maximized. This video discusses the value in having the ball and the clubhead travel at the same speed and gives you a few ideas on how to make that happen...

Things to remember:

  • Avoid too much shaft lean and feel the hands and the shaft lining up at impact
  • This should give you a sense of using the bounce or sole of the club more through impact
  • Don't be afraid to allow the lead wrist to unhinge/extend as soon as possible through impact

Keep in mind that while very high spin rates are sexy, your final objective should be control. Better control and predictability means better results. Don't allow a quest for more spin erode your ability to get the ball close to the hole!

Thanks for watching and check in soon for my next in the Spinning the Wedges series on Spin Loft.

Wedge Project Color.jpg

Surviving the Shanks

This malady has the ability to ruin the game for any golfer. I have seen golfers spend thousands of dollars, seek counseling, sell their clubs and quit playing the game because they could not overcome the dreaded shanks.

Shanks most often occur when the club approaches the ball too far from the outside, but every now and then, particularly with better players, shanks can be due to the club approaching too far from the inside.

This video will help all hosel rocketeers, but mostly those whose club is approaching too far from the outside. Watch...

When you start to hit shanks try to keep your heart/emotions out of the equation and use your head/intellect.

Notes when practicing:

  • DO NOT move further away from the ball as this will often exacerbate the problem
  • Count out 10 balls to do the drill
  • Set up as you normally would with the clubhead centered behind the ball
  • Scrunch your toes towards your heels to keep you from toppling toward the ball
  • Make two practice swings from this start position but swing inside the ball
  • Hit the shot making a strong effort to hit the ball well off the toe of the club
  • Repeat this 10 times without emotion

Notes when playing:

  • After you've hit one shank on the course find an old divot and set up to as you normally would 
  • Scrunch your toes back towards your heels
  • Make four practice swings where the club passes inside the divot
  • The next shot you play do the same thing making sure you emphasize a toe-sided strike

You can do this, but the big challenge is keeping emotion at bay. Keep your head in the equation, use your understanding and you've got a chance.

And while we're on the topic. How about a little shank trivia? Did you know that a shank will often strike the face twice and sometimes even three times, as evidenced here...

The World-Class Triple Hit Shank

The World-Class Triple Hit Shank

NO PENALTY THOUGH! As if hitting that shot was not penalty enough....

This free website's biggest source of support is when you have simply seen enough and decide to call to book a lesson or golf school. You can contact me HERE. If you live in another state or country please consider making a purchase HERE or HERE. It will help your game and it will help me to keep adding to this free website. Thanks again for your support! Andrew.


Divot Patterns

It has often amazed me how a golfer's personality tends to shine through in the manner in which they practice. Some are neat and tidy while others seem to be all over the map! Good golfers however, always seem to manage their practice sessions and the turf they have at their disposal. Creating good divot patterns when you practice might not be the key to you shooting under par, but you'll look good and might even make a few friends while you're at it...

The Excavator

The Excavator

The excavator tends to:

  • be a more experienced and often, better player
  • clear cut any and all life forms from the rectangle where they've been hitting irons
  • make it very difficult for the turf they use to grow back in a timely fashion
  • cause the practice tee to be uneven and wavy
The Roamer

The Roamer

The roamer tends to:

  • use up as much space on the practice tee as is humanly possible
  • be a type AA personality
  • not be too bad for turf growth and management
  • makes it very difficult for the golfer using the space behind them
The Striper

The Striper

The striper tends to:

  • be an experienced, better golfer
  • is efficient with turf usage - they get the most out of the space they use
  • make it easy for the turf to recover and fill in
  • use an alignment aid to help both their golf and divot patterns
  • is a friend to superintendents everywhere

This video with Chris Young, head superintendent at Berkeley Hall, will help you get the picture...

If you feel this article and video could be a help to golfers and superintendents where you play and practice please share it with them. This is a must share for all excavators and roamers you know.

Thanks for tuning in.

A Drill for Skill

As anyone who follows me here or on social media is aware I am a huge fan of skill development for my students. I believe the ability to precisely control the clubhead, clubface and strike point though impact is what makes the difference between a great golfer and someone who is merely, a golfer.

I recorded the following TrackMan screencast following a lesson I recently did with a strong collegiate golfer named Seth Gandy. My objective was to not only give Seth the feel necessary to be able to hit draws, but also to improve his ability at controlling the amount of draw. Watch...

I created what I called the Clubpath Ladder Drill for any golfer to become skillful at controlling the shape of their golf shots. I am a big proponent of what I call practicing "outside the lines" and this drill forces the golfer to hit a sequence of shots where not two are alike. Keep in mind I wanted Seth to be able to hit his go to baby fade, but by making him practice shots that are outside his comfort zone he is improving his skill at making the club communicate his intent to the ball - a necessity for great golf.

If you are a coach who uses radar technology or even a golfer looking to improve your skills I would encourage to add this type of practice into your improvement plan. You can apply this ladder type drill to a variety of elements including club speed, dynamic loft and even face angle.

Have some fun with this and if you can fit more than ten shots into the clubpath ladder drill please let me know. That's very good!

Remember this - technique will get you into the arena, but it's skill that gets you onto the podium!.

The Truth about Divots

Demonstrating the Impact Drag Drill

Demonstrating the Impact Drag Drill

I think divots are over-rated. They are not integral to great ball striking and they certainly don't give us as much information pertaining to the swing that led to the divot as we have been led to think. And to think that I used to love them, I used to encourage all my students, even ladies, to hit down and take divots...

Times have changed! TrackMan has shown me that far more golfers hit down too much than those who don't hit down enough. The "hit down" mantra has been flogged to death.

This video I filmed in conjunction with Revolution Golf will give you some idea as to what to look for as you work towards an improved and shallower strike on the ball.

As Martin Chuck so aptly said in this very good follow up video, "We're looking for bacon strips, not pork chops!" A shallow strike will improve the crispness of your strike - give it a try.

Thanks for reading along.

What Can Your Driver Tell You?

One of the first things I do when I teach a golfer for the first time is I go through their clubs and take a look for certain tendencies as we're having our introductory chat. I have seen so many drivers that look like the one in this article that I had to write about it and share what your driver is attempting to tell you!

The first place to look for answers as to what might be going on is to check the face....

Driver Face

Driver Face

Notice here how the black paint is being worn off the bottom of the face and there are numerous impact marks on the upper portion of the face where sand is caught between the ball and the face.

Secondly, inspect where the crown of the club meets the face....

Driver Top Edge

Driver Top Edge

Here, the wear pattern indicates numerous pop-ups.  A few balls must have almost been missed to get them that far up on the crown.  Keep in mind that the only way to hit a pop-up is to have a descending blow where the top edge descends below the equator of the ball.

Finally, take a look at the sole of the club....

Sole of the Driver

Sole of the Driver

It is apparent here that the club is making contact with the ground on almost every shot.  The attack angle is very much down - to such a degree that both the paint and lettering are being buffed off the sole of this club.

The golfer who owns this club hit down on the ball with an attack angle of -11 degrees.  Keep in mind that optimally we would like to hit up on the ball for maximum efficiency.  I am pleased to report that he is working hard at his new attack angle and he is fairly comfortable in the -3 degree range - not perfect but better. Oh, and he just might extend this poor clubs lifespan at the same time.

Clearly I have selected an extreme example to show you here, but take a minute and inspect these three key areas on your driver.  I believe you will learn a fair deal about your angle of attack and why your golf ball is doing what it does.  Keep in mind that the only time a driver should ever contact the ground is when you are addressing the ball.  It should never contact the ground after the first foot or so of the swing. The only marks on it should be tee marks running along the sole and perhaps a ball mark or two in the center of the face!

Here are a few resources to help you hit more up on the ball:

Getting More Out of Your Driver

Understanding Heel and Toe Klankers...

As the size of the clubhead has increased over the last two decades so has the role that gear effect plays on off-center strikes. As the volume of the head increases so does the importance of a quality strike. I think the following video will go a long way towards explaining how this works and what it can mean for your game...

Now keep in mind that gear effect can be a help or a hindrance - it can cause your ball to curve to the target or away from it. Here's an example of how an understanding of the importance of strike point, particularly with the driver, can help any golfer avoid trying to fix something that isn't broken.

A Neutral Swing with a Heel Strike

A Neutral Swing with a Heel Strike

The Same Neutral Swing with a Toe Strike

The Same Neutral Swing with a Toe Strike

Notice how the delivery numbers (attack angle & clubpath) from the above two shots are eerily similar, yet the resultant ball flight could not be more different. The difference in the outcome of the examples above is purely due to the location of the strike for each shot. While the two shots are very different I see no need for this player to address their swing. They simply need to develop their skill at striking the ball in a consistent location on the face.

  • Toe sided strikes will lead to more draw or less fade.
  • Heel sided strikes will lead to more fade or less draw.
  • High strikes on the face elevate launch and decrease spin.
  • Low strikes on the face lower launch and increase spin.
  • Gear effect works in 3D - the head will twist away from the strike location.
  • If the CoG is closer to the strike point, then there will be less curvature from gear effect on off-center hits. 
  • If the CoG is further from the strike point, then there will be more curvature from gear effect on off-center hits. 
  • Controlling the strike location is a skill - practice accordingly.

If you're looking to gain a better understanding of how you're striking the ball with your  "headcover" clubs, buy yourself a few cans of Dr. Scholl's Odor X. Spray the face of your driver the next time you're warming up or practicing to get some all important feedback.

Your next question might be - "How do I upgrade where I'm striking the ball?" Valid. I am of the opinion that controlling the strike point is a skill. A fun drill is to practicing striking the ball in a variety of unusual, yet intentional, locations on the clubface. Here are additional resources to help you understand and manage the strike point:

Collision! — Andrew Rice Golf

Strike Point Drill — Andrew Rice Golf

Optimal Strike Point for Longer Drives — Andrew Rice Golf

Spin Rate and the Driver — Andrew Rice Golf

Swing Pattern vs Strike Point — Andrew Rice Golf

A Proper Putting Set Up

I see far too many "regular" golfers setting up with their hands too low and the toe of the putter way up in the air. The picture below shows the difference between what it should look like and what I see all too frequently...

puttingsetup.jpg

If the toe of the putter is overly elevated, as we see above, then the effective loft on the face (and a putter always has some loft) will point left for right handers.

Here's a video I made after a recent lesson that shows what to look for, the changes and how to make the necessary adjustments to set up like the pros.

Spend some time with your putter in front of the mirror and you'll soon start to grasp the sense required in order to improve how you set up correctly to your putter.

Thanks for reading and please post your comments below.


Driver Education

Here's a fun video I filmed in collaboration with Mark Crossfield and Denis Pugh. I believe it covers almost all the pertinent points any golfer should be looking into in order to be able to hit the ball longer and straighter...

I hope you enjoyed this and are keen to get out there and try a few of the suggested ideas and drills to see if you can improve off the tee.

Thanks for watching!

The Importance of Wrist Angles

wristangles.jpg

I believe that for years I have misunderstood the importance of wrist angles throughout the golf swing. The most important part of any golf swing is the players ability to manage the face angle relative to the club path and wrists are integral in positioning the clubface properly throughout the swing.

I have come to realize that wrist angles are more important than grip position/angles. I see far too many golfers with very strong grips who slice the golf ball! If you'd like to hit draws (and you should) then you need the clubface closed relative to the path and a bowed lead wrist throughout the swing will do wonders in enabling you to hit those lovely, baby draws.

If you study the above photograph you'll see four very different, and very functional, looks regarding wrist angle at the top of the backswing. Due to the fact that most golfers slice the ball I would encourage all slicers and faders to work towards emulating Dustin Johnson (far right) in their practice. I'm not saying that with a bowed left wrist you are guaranteed to hit draws, but it does allow for functional options regarding shot shape.

Here is a helpful video I filmed on  recent trip with my friend in Ireland, Stephen Ennis from Balcarrick GC.....

Talking to Andrew Rice on why a strong lead hand can cause a bowed lead wrist and possibly lead to a fade/cut/slice. Andrew gives us a good drill to start hitting a little draw.

I love this from my friend Joe Mayo (@TrackManMaestro):

"When one embraces the idea that a functional face to path relationship is the bottom line of the golf swing, it allows them to let go of positional golf instruction and the veil of confusion of how great swings of the past and present actually work is lifted."

The golf swing really does not have to have a certain appearance in order to function - it simply needs a predictable face to path relationship. And the wrist angles are vital in managing this relationship.

leetrevino.jpg

Thanks for reading! If you're looking to experience a little sunshine in the cold northern hemisphere winters check THIS out.